
Creating a multiplayer world in Minecraft Java opens up an exciting realm of collaborative gameplay and creativity, allowing you and your friends to join forces, explore, and construct together in a shared virtual environment. Multiplayer mode enhances the Minecraft experience by fostering camaraderie, strategizing, and resource sharing, as players embark on adventures and build sprawling landscapes. This guide will walk you through the essential steps to establish your very own multiplayer world, fostering an engaging and interactive gaming experience like no other.
To commence this journey, the first step is to ensure that all participants possess a Minecraft Java Edition account. This edition is renowned for its extensive modding capabilities and cross-platform compatibility. Once everyone has an account, you’ll need to select a hosting option. Two primary approaches are available: setting up a self-hosted server on your own hardware or renting a server from a third-party provider. The latter offers the benefit of reliability, dedicated technical support, and reduced lag, providing an optimal environment for seamless multiplayer gameplay.
Upon determining the hosting method, proceed to configure the server settings. Minecraft Java Edition offers an array of server customization options, such as world type, difficulty, and game mode. Furthermore, you can tailor the experience by enabling or disabling certain in-game features, making the environment tailored to your group’s preferences.
Inviting friends to your newly established server is the next step. This can be done by sharing the server’s IP address with them. Collaboratively setting up a Discord or voice communication channel can further enhance the multiplayer experience, facilitating efficient communication and coordination between players.
As the world takes shape and players contribute their unique talents, Minecraft’s innate creativity flourishes in the multiplayer setting. Collaborative construction, expansive landscapes, and shared achievements become a testament to the power of teamwork and imagination. It’s essential to establish a set of rules or guidelines to ensure a harmonious gameplay environment where everyone’s efforts are valued.
Crafting a multiplayer world in Minecraft Java Edition offers an immersive platform for friends to unite, explore, and build together. The dynamic blend of creativity, strategy, and camaraderie fosters a unique gaming experience that continuously evolves as the world grows. By following the steps outlined in this guide, you’re well on your way to embarking on a captivating journey within the boundless realm of multiplayer Minecraft.
How do you play Minecraft Multiplayer without LAN Java?
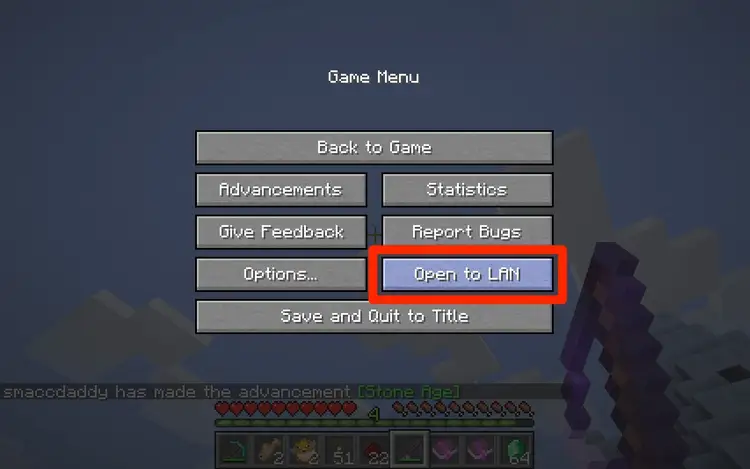
Playing Minecraft multiplayer without LAN in the Java Edition involves setting up a server either through a hosting service or by self-hosting. Here’s a step-by-step guide on how to achieve this:
Option 1: Using a Hosting Service
- Choose a Hosting Provider: Research and select a third-party hosting service that offers Minecraft server hosting. Some popular options include Apex Hosting, Akliz, and MCProHosting. Compare their features, pricing, and customer reviews to find the best fit for your needs.
- Select a Plan: Sign up for a plan that suits the number of players you expect and the level of performance you desire. Hosting providers usually offer various plans with different amounts of RAM, player slots, and additional features.
- Configure Your Server: After signing up, you’ll usually have access to a control panel or dashboard where you can configure your server settings. You can set the server name, game mode, difficulty, and more.
- Invite Players: Once your server is set up, you’ll receive an IP address and port number. Share this information with your friends so they can join your server by entering the IP address in the “Direct Connect” field of the multiplayer menu in Minecraft.
Option 2: Self-Hosting a Server
- Download the Minecraft Server Software: Visit the official Minecraft website and download the server software. Make sure to download the version that matches your Java Edition game version.
- Set Up the Server: Create a new folder on your computer to hold the server files. Place the downloaded server software in this folder. Run the server software once to generate the necessary configuration files.
- Configure Server Properties: Open the “server.properties” file in a text editor. Customize settings such as server name, game mode, difficulty, and more. Save the changes.
- Port Forwarding: To allow other players to connect to your server, you’ll need to set up port forwarding on your router. Log in to your router’s settings and forward the Minecraft server port (default is 25565) to your computer’s local IP address.
- Start the Server: Run the server software again. Your server will start, and you’ll see a console window displaying server logs.
- Invite Players: Your external IP address can be found by searching “What is my IP” on a search engine. Share this IP address with your friends, and they can join your server by entering it in the “Direct Connect” field of the multiplayer menu in Minecraft.
Remember that self-hosting requires technical knowledge, especially when dealing with router settings and potential firewall issues. Additionally, both hosting options may require some troubleshooting and maintenance over time to ensure smooth gameplay for all players.
Ways to create multiplayer world in Minecraft Java
There are several ways to create a multiplayer world in Minecraft Java Edition. Here are some of the most common methods:
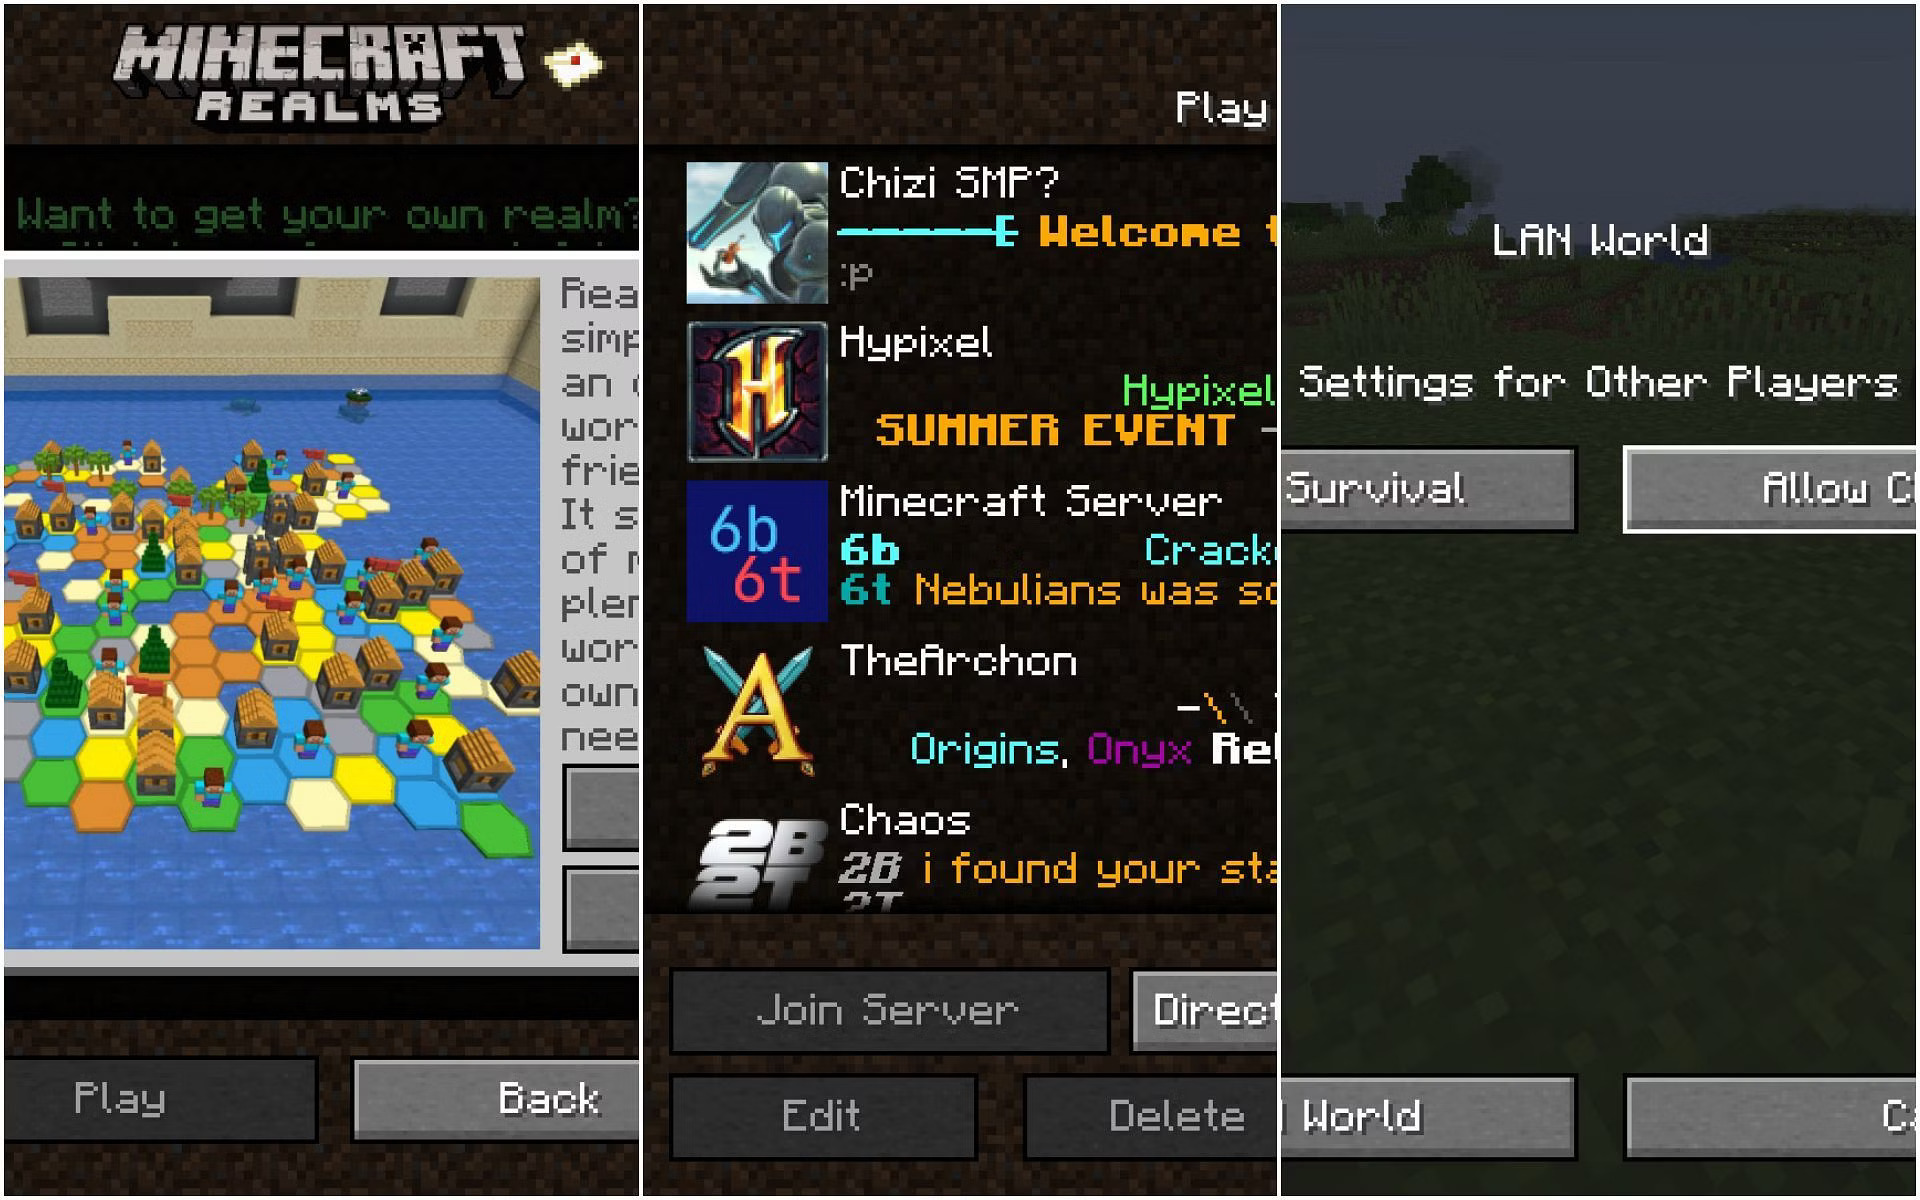
- Minecraft Realms: Minecraft Realms is a subscription-based service provided by Mojang that offers an easy way to set up and manage a multiplayer world. With Realms, you can invite friends to join your world and play together. Realms handles much of the technical setup and maintenance, making it a user-friendly option for players who want a hassle-free multiplayer experience.
- Self-Hosted Server: Setting up a self-hosted server gives you more control over your multiplayer world’s configuration. You can download the official Minecraft Server software from the Minecraft website. This method requires more technical knowledge and involves port forwarding, configuring server settings, and managing server files. However, it provides greater customization options and can be cost-effective if you have the necessary hardware.
- Third-Party Hosting Providers: Many companies offer server hosting services specifically designed for Minecraft. These providers offer various packages with different levels of performance, features, and customization options. Some popular hosting services include Apex Hosting, Akliz, and MCProHosting. This option eliminates the need for complex server setup, as the hosting provider handles most of the technical aspects.
- LAN Multiplayer: If you’re playing with friends who are on the same local network (LAN), you can set up a LAN multiplayer session. Simply create a world on your computer and ensure that everyone is connected to the same Wi-Fi network. Other players can then join your game by selecting your world from the LAN server list.
- Direct Connect: If you’re playing with friends who are not on the same LAN but want to play together, you can use the “Direct Connect” feature. One player needs to run a server on their machine and share their IP address with others. Friends can then connect to the server by entering the host’s IP address in the “Direct Connect” field on the multiplayer menu.
- Mods and Plugins: If you’re looking to enhance your multiplayer experience with additional features or modifications, you can use mods and plugins. Forge and Spigot are popular platforms for adding mods and plugins to Minecraft Java Edition servers, respectively. These can introduce new gameplay mechanics, customizations, and even mini-games to your multiplayer world.
When choosing the method that suits you best, consider factors such as technical proficiency, desired level of control, budget, and the number of players you plan to host. Each method has its own advantages and challenges, so make sure to research thoroughly and choose the one that aligns with your preferences and requirements.
How can I play Minecraft with friends without LAN?
You can play Minecraft with friends without using LAN by setting up a dedicated server or by utilizing a third-party server hosting service. Here’s a step-by-step guide for each method:
Method 1: Setting Up a Dedicated Server
- Download Minecraft Server Software: Go to the official Minecraft website and download the server software for the version of Minecraft you’re playing.
- Create a Server Folder: Create a new folder on your computer where you want to store your server files. Place the downloaded server software in this folder.
- Configure Server Properties: Open the “server.properties” file in a text editor. Customize settings such as server name, game mode, difficulty, and more. Save the changes.
- Port Forwarding: To allow your friends to connect to your server, you’ll need to set up port forwarding on your router. Log in to your router’s settings and forward the Minecraft server port (default is 25565) to your computer’s local IP address.
- Start the Server: Run the server software. The server will start, and you’ll see a console window displaying server logs.
- Share Server IP: Find your external IP address (search “What is my IP” on a search engine). Share this IP address with your friends, and they can join your server by entering it in the “Direct Connect” field of the multiplayer menu in Minecraft.
Method 2: Using a Third-Party Server Hosting Service
- Choose a Hosting Provider: Research and select a third-party hosting service that offers Minecraft server hosting. Some popular options include Apex Hosting, Akliz, and MCProHosting.
- Select a Plan: Sign up for a plan that suits the number of players you expect and the level of performance you desire.
- Configure Your Server: Access the control panel or dashboard provided by the hosting service. Configure your server settings, such as game mode, difficulty, and more.
- Invite Players: Once your server is set up, you’ll receive an IP address and port number. Share this information with your friends so they can join your server by entering the IP address in the “Direct Connect” field of the multiplayer menu in Minecraft.
Both methods have their advantages and challenges. Dedicated servers provide more control but require technical knowledge, while third-party hosting services offer convenience but may come with additional costs. Whichever method you choose, make sure to follow the setup instructions carefully and ensure that your friends have the necessary server information to join your multiplayer game.
How do I join my friends Java world?
To join your friend’s Java world in Minecraft, you need to follow these steps:
Option 1: Joining via Direct IP
- Get the Server IP Address: Ask your friend for the IP address of the server they’re hosting. This is a series of numbers separated by periods, such as “123.456.789.123”.
- Launch Minecraft: Open the Minecraft Java Edition on your computer.
- Go to Multiplayer: From the main menu, select the “Multiplayer” option.
- Add Server: Click on the “Add Server” button to add your friend’s server to your list.
- Enter Server Information: Enter a name for the server in the “Server Name” field. In the “Server Address” field, type in the IP address that your friend provided. You can leave the port number blank, or if your friend specified a different port, you can include it by separating the IP and port with a colon (e.g., “123.456.789.123:25565”).
- Save: Click “Done” or “Add Server” to save the server information.
- Join the Server: Click on the server name in your multiplayer list and then click the “Join Server” button to connect to your friend’s world.
Option 2: Using Invite Links (if available)
Some hosting services or platforms may provide invite links, making it even easier to join your friend’s server:
- Receive Invite Link: Your friend provides you with an invite link to the server.
- Click the Link: Click on the invite link. It may direct you to open Minecraft and automatically add the server to your multiplayer list.
- Confirm: If prompted, confirm that you want to add the server to your list.
- Join the Server: Once the server is added, select it from your multiplayer list and click the “Join Server” button.
Remember that your friend’s server needs to be online and running for you to be able to join. If you encounter any issues, double-check that you entered the IP address or invite link correctly. Additionally, make sure you’re both using the same version of Minecraft Java Edition to ensure compatibility.
How To Turn Your Minecraft: Java Edition Singleplayer World Into A Multiplayer Server For Free
Converting your Minecraft: Java Edition single player world into a multiplayer server for free involves some technical steps. Keep in mind that this method might not be as user-friendly or reliable as paid options or third-party hosting services, but it’s a viable way if you’re comfortable with a bit of technical work. Here’s a general guide on how to do it:
Step 1: Backup Your Singleplayer World
Before you begin, it’s crucial to make a backup of your single player world. This is to ensure that your progress is preserved in case something goes wrong during the conversion process.
Step 2: Download and Set Up the Server Software
- Go to the official Minecraft website and download the Minecraft Server software for the version of the game that matches your single player world.
- Create a new folder on your computer where you want to store your server files. Place the downloaded server software in this folder.
- Run the server software. It will generate some files, including a “server.properties” file that you’ll need to configure.
Step 3: Configure Server Properties
- Open the “server.properties” file in a text editor (like Notepad on Windows or TextEdit on macOS).
- Customize settings such as server name, game mode, difficulty, and more to match the settings of your singleplayer world.
- Save the changes to the “server.properties” file.
Step 4: Move Your Singleplayer World
- Locate your single player world’s folder. In Minecraft, you can find it by going to Options > Resource Packs > Open Resource Pack Folder, then going up one level in the file directory.
- Move your single player world’s folder into the same folder where you placed the server software.
Step 5: Port Forwarding
To allow other players to connect to your server, you need to set up port forwarding on your router. The default Minecraft server port is 25565. Log in to your router’s settings and forward this port to your computer’s local IP address.
Step 6: Start the Server
- Run the server software again. You might need to accept the EULA by changing “eula=false” to “eula=true” in the “eula.txt” file generated by the server.
- Your server will start, and you’ll see a console window displaying server logs.
Step 7: Invite Friends
Share your external IP address with your friends, and they can join your server by entering it in the “Direct Connect” field of the multiplayer menu in Minecraft.
Remember that this method requires you to have a stable internet connection, and there may be complications or performance issues. Additionally, since this approach requires port forwarding, it’s essential to be aware of potential security concerns.
Conclusion!
In conclusion, delving into the realm of multiplayer Minecraft in the Java Edition unlocks a vibrant tapestry of communal exploration, creativity, and collaboration. The journey to crafting a shared world is a thrilling one, and the approaches to achieving this are as diverse as the landscapes players can sculpt within the game itself.
From leveraging the convenience of Minecraft Realms to the hands-on adventure of self-hosting, you’ve learned that options abound. Each avenue brings its own advantages, whether it’s the user-friendly nature of Realms or the intricate control over settings that self-hosting offers.


