
Minecraft, the immensely popular sandbox game, allows players to unleash their creativity by constructing magnificent structures, battling fierce creatures, and embarking on thrilling adventures. Among the countless tools and features available to players, the armor stand stands out as a versatile addition to any player’s arsenal. An armor stand not only serves as an aesthetically pleasing display for your precious armor sets but also allows for convenient storage and organization. In this tutorial, we will delve into the intricacies of crafting an armor stand, guiding you step by step through the process of creating this essential item.
The first step in creating an armor stand is to gather the necessary materials. Fear not, for they are relatively easy to obtain. To construct an armor stand, you will need six sticks and a single smooth stone slab. Sticks are obtained by crafting them from wooden planks, while smooth stone slabs can be created by smelting cobblestone in a furnace. With these materials in hand, you are ready to embark on your journey to create a functional and visually appealing armor stand.
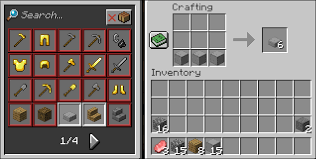
Once you have gathered the required materials, it is time to head to the crafting table. Accessing the crafting table interface is as simple as right-clicking on the table. In the 3×3 crafting grid, carefully place the six sticks in a symmetric pattern. You should arrange them in a straight vertical line in the middle column. Next, place the smooth stone slab on top of the middle stick, aligning it vertically. Following these steps, you should see the shape of an armor stand forming within the crafting grid.
Where to find an Armor Stand in Creative Mode

In Creative Mode, locating an armor stand is incredibly simple and convenient. Instead of having to gather materials and craft the armor stand manually, you can directly access it from the inventory menu. Here’s how to find an armor stand in Creative Mode:
- Launch Minecraft and start a new Creative Mode world or open an existing one.
- Once inside the world, press the “E” key (for PC) or the corresponding button for your platform to open the inventory menu.
- In the inventory menu, you will see a wide range of blocks, items, and tools available for selection. Look for the search bar or browse through the various categories until you find the “Decoration” or “Redstone” category.
- Within the “Decoration” or “Redstone” category, you should find the armor stand. It is represented by a small wooden figure with an armor set displayed on it.
- Click on the armor stand icon to select it. You can then exit the inventory menu.
- Position your cursor at the desired location in the game world where you want to place the armor stand.
- Finally, right-click (or tap, depending on your platform) to place the armor stand in the selected location.
Now you have successfully located and placed an armor stand in Creative Mode! Feel free to experiment with different armor sets, positions, and arrangements to create stunning displays or organized storage for your collected gear. Remember, Creative Mode offers endless possibilities, so let your imagination run wild and have fun creating and customizing your Minecraft world!
Required Materials to Make an Armor Stand
To make an armor stand in Minecraft, you will need the following materials:
- Smooth Stone Slab: You will need one smooth stone slab. To craft a smooth stone slab, you will require three smooth stones. To obtain smooth stone, you need to smelt regular cobblestone in a furnace.
- Sticks: You will need six sticks. Sticks can be crafted by placing two wooden planks of any type (oak, birch, spruce, jungle, acacia, or dark oak) in a vertical pattern in the crafting table.
These two materials are the only requirements for crafting an armor stand. Once you have gathered the smooth stone slab and sticks, you are ready to proceed to the crafting process.
It’s important to note that this recipe is for the Java Edition and Bedrock Edition of Minecraft. If you are playing an older version or a modded version of the game, the recipe might vary slightly. However, for most standard versions of Minecraft, these materials are all you need to create an armor stand.
How to get sticks in Minecraft
To obtain sticks in Minecraft, follow these simple steps:
- Find Trees: Locate any type of tree in the Minecraft world. Trees can be found in various biomes, such as forests, plains, taigas, and more.
- Gather Wood: Use your bare hands or an appropriate tool, such as an axe, to break the wood blocks that make up the trunk of the tree. Hold down the left mouse button or the corresponding button on your platform until the block breaks and drops as an item.
- Craft Wooden Planks: Open your inventory or crafting table and place the wood blocks into any slot. This will convert them into wooden planks. Each wood block yields four wooden planks.
- Crafting Sticks: In your crafting table, place two wooden planks in a vertical pattern, one on top of the other. This will create four sticks.
- Collect Sticks: Click and drag the resulting sticks into your inventory or take them from the output slot in the crafting table.
Now you have successfully obtained sticks in Minecraft! Sticks are a versatile and essential resource used in numerous crafting recipes, such as tools, weapons, torches, and more. Ensure you gather an ample supply of sticks to support your crafting needs and various in-game activities.
How to get a smooth stone slab in Minecraft
To obtain a smooth stone slab in Minecraft, follow these steps:
- Obtain Cobblestone: Find a source of cobblestone in the Minecraft world. Cobblestone can be obtained by mining stone blocks with a pickaxe, commonly found underground or on the surface of certain biomes.
- Craft a Furnace: Open your inventory or crafting table and place eight cobblestone blocks in a 3×3 crafting grid, leaving the center square empty. This will create a furnace.
- Smelt Cobblestone: Place the furnace in the world and right-click on it to open the furnace interface. In the top slot, place the cobblestone you want to smelt. In the bottom slot, add a suitable fuel source, such as coal or charcoal. The fuel will be consumed during the smelting process.
- Retrieve Smooth Stone: Once the fuel is added, the cobblestone will start smelting. Wait for the process to complete, and the cobblestone will transform into smooth stone. Each cobblestone smelts into one smooth stone.
- Craft Smooth Stone Slab: Open your inventory or crafting table and place three smooth stone blocks in a horizontal row across the bottom row of the 3×3 crafting grid. This will yield six smooth stone slabs.
- Collect Smooth Stone Slabs: Click and drag the resulting smooth stone slabs into your inventory or take them from the output slot in the crafting table.
Now you have successfully obtained smooth stone slabs in Minecraft! Smooth stone slabs have a variety of uses, such as building, decoration, and crafting other items. Make sure to gather enough smooth stone slabs to fulfill your construction and design needs.
How to craft an Armor Stand in Survival Mode
To craft an armor stand in Survival Mode in Minecraft, you will need to follow these steps:
- Gather the required materials: You will need one smooth stone slab and six sticks.
- Obtain smooth stone: To create smooth stone, you need to smelt regular cobblestone in a furnace. Place cobblestone in the top slot of the furnace and add fuel (such as coal or wood) to the bottom slot. Once the cobblestone is smelted, it will turn into smooth stone.
- Craft sticks: To create sticks, open the crafting table and place two wooden planks of any type (oak, birch, spruce, jungle, acacia, or dark oak) in a vertical pattern. This will yield four sticks.
- Open the crafting table: Right-click on the crafting table to open the 3×3 crafting grid.
- Place the materials in the crafting grid: In the crafting grid, place the six sticks in a symmetric pattern. Arrange them in a straight vertical line in the middle column. Then, place the smooth stone slab on top of the middle stick, aligning it vertically.
- Retrieve the armor stand: Once you have placed the materials correctly in the crafting grid, an armor stand will appear in the result box of the crafting table.
- Move the armor stand to your inventory: Click on the armor stand in the result box, and it will be moved to your inventory.
Now you have successfully crafted an armor stand in Survival Mode! You can place and use it as a display for your armor sets or as a means of convenient storage and organization.
Item ID and Name
In Minecraft, every item and block has a unique identification number and name. Here are the item ID and name for the armor stand:
Item ID: Minecraft: armor_stand
Item Name: Armor Stand
These identifiers are used in commands and data packs to refer to the armor stand item. You can use these IDs and names in various Minecraft commands or when working with external tools or mods that require specific item references.
It’s worth noting that item IDs and names can vary depending on the Minecraft version and edition you are playing. The above information is accurate as of Minecraft Java Edition 1.17 and Bedrock Edition 1.17. It’s always a good idea to double-check the specific version you are playing to ensure accuracy.
Give Command for Armor Stand
The give command in Minecraft allows you to add items directly to your inventory or give them to other players. To obtain an armor stand using the give command, use the following syntax:
For Java Edition:
/give minecraft:armor_stand
For Bedrock Edition:
/give armor_stand
Replace <player> with the player’s username or target selector (@p for the nearest player, @a for all players, etc.). If you want to give multiple armor stands, specify the desired <amount> (e.g., 1, 2, 64).
Here are a couple of examples:
For Java Edition:
/give Steve minecraft:armor_stand 1
For Bedrock Edition:
/give Steve armor_stand 1
Executing this command will give the player (or specified target) one armor stand, which will be added to their inventory. You can then place the armor stand in the game world to use it as a display or for organization purposes.
Remember to ensure that you have the necessary permissions or are in Creative Mode to execute commands.
Things to Do with Armor Stands
Armor stands in Minecraft are versatile tools that offer several possibilities for players to enhance their gameplay and creativity. Here are some things you can do with armor stands:
- Display Armor Sets: Armor stands are perfect for showcasing your collected armor sets. Equip the armor onto the armor stand, and it will wear the pieces just like a player would. This allows you to create impressive displays in your bases, armories, or trophy rooms.
-
Pose and Decoration: Armor stands can be manipulated to strike different poses by using commands or by placing specific items in their hands. You can create dynamic scenes or decorative arrangements by positioning the armor stand in various stances or holding items like swords, tools, or banners.
- Weapon and Tool Storage: Utilize armor stands as an organized storage solution for your weapons and tools. Place weapons or tools on the armor stand, and they will remain displayed until you need them. This makes it easy to access and identify the right item for the task at hand.
- Articulated Figures: Use armor stands to create articulated figures or statues. By placing multiple armor stands in specific positions and orientations, you can construct complex structures like human or animal figures. This is a great way to add life and detail to your builds.
- Redstone Triggers: Armor stands can interact with redstone components, such as pressure plates or tripwires, to activate mechanisms. By placing armor stands on these triggers, you can create intricate redstone contraptions or hidden doors that open when the armor stand is moved or activated.
- Custom Minigames: Incorporate armor stands into custom minigames or adventure maps. You can make use of their interaction with redstone, items, and poses to create challenges, puzzles, or engaging gameplay mechanics for players to enjoy.
- Marker for Mob Farms: Armor stands can act as reference points or markers in mob farms. By placing armor stands in strategic positions, you can measure distances, guide spawning patterns, or mark specific areas for optimal mob farming efficiency.
These are just a few examples of the many possibilities armor stands offer in Minecraft. Get creative and experiment with different ideas to make the most of this versatile in-game tool!
NBT Tags for Armor Stand
In Minecraft, NBT (Named Binary Tag) tags are used to store additional data and properties for various entities and items, including armor stands. By utilizing NBT tags, you can modify the behavior and appearance of an armor stand. Here are some common NBT tags used with armor stands:
- Custom Name:
- NBT Tag: CustomName
- Purpose: Allows you to give the armor stand a custom name that will be displayed above it.
- Invisible:
- NBT Tag: Invisible
- Purpose: Makes the armor stand invisible if set to 1 (true) or visible if set to 0 (false).
- NoGravity:
- NBT Tag: NoGravity
- Purpose: Determines whether the armor stand is affected by gravity. If set to 1 (true), it will not fall or be affected by gravity.
- ShowArms:
- NBT Tag: ShowArms
- Purpose: Controls whether the armor stand’s arms are visible. Set to 1 (true) to display the arms or 0 (false) to hide them.
- Small:
- NBT Tag: Small
- Purpose: Modifies the size of the armor stand. If set to 1 (true), the armor stand will become smaller.
These are just a few examples of NBT tags that can be used with armor stands. To modify the NBT tags of an armor stand, you can use commands or external tools that support NBT editing. It’s important to note that some of these tags might require the use of additional commands or tools to set their values.
By utilizing NBT tags, you can customize armor stands to suit your specific needs, whether it’s for decorative purposes, redstone contraptions, or creative builds.
Conclusion
In conclusion, crafting an armor stand in Minecraft is a straightforward process that requires a few simple steps. By following the instructions provided, you can easily create this versatile item that serves as both a functional storage solution and a decorative element in your Minecraft world.
To make an armor stand, you will need one smooth stone slab and six sticks. Smooth stone slabs can be obtained by smelting cobblestone in a furnace, while sticks can be crafted from wooden planks. Once you have gathered these materials, access a crafting table and arrange the sticks in a vertical line with the smooth stone slab on top. This arrangement will yield an armor stand. Armor stands have multiple applications, including displaying armor sets, organizing weapons and tools, creating decorative arrangements, and serving as markers in mob farms. They can be customized further using NBT tags to modify their appearance and behavior.


