
In the vast and pixelated world of Minecraft, players have the power to shape and create their own virtual realms. From constructing magnificent castles to designing elaborate redstone contraptions, the possibilities are endless. One essential aspect of Minecraft’s creative potential lies in the ability to craft and customize armor stands. These versatile entities serve as both functional tools and aesthetic elements, allowing players to display their prized armors and artifacts in style. Whether you’re a seasoned builder or a novice adventurer, this guide will take you on a journey through the intricacies of making armor stands in Minecraft, unraveling the secrets to their creation and customization.
Armor stands are a fundamental component in Minecraft, serving as the perfect solution for showcasing and organizing your vast collection of armors. By placing these stands strategically, you can proudly display your hard-earned armor sets, transforming your realm into a gallery of epicness. Whether you wish to exhibit your enchanted diamond armor or create a themed armor showcase, mastering the art of armor stands is a skill worth acquiring. With a bit of knowledge and creativity, you can elevate your Minecraft experience to a whole new level.
Creating an armor stand in Minecraft is a relatively straightforward process, requiring only a few simple materials and the use of a crafting table. However, the true magic lies in customizing these stands to suit your individual tastes. By exploring various commands, players can manipulate armor stands to pose, hold items, or even wear decorative blocks. Understanding the intricacies of these commands opens up a realm of possibilities for creative expression and immersive storytelling. Whether you seek to mimic a museum exhibit or design an interactive scene, the potential for personalization is limitless.
As you embark on your journey in Minecraft, don’t overlook the power of armor stands as a means of self-expression and functional organization. By mastering the art of creating and customizing these stands, you’ll unlock a world of creativity and bring your virtual realm to life. So gather your materials, ready your crafting table, and let’s delve into the intricacies of armor stands in Minecraft. Get ready to showcase your armor collection like never before!
What is an Armor Stand?
An armor stand is a special entity in Minecraft that allows players to display and showcase their armor sets, weapons, and other decorative items. It serves as a platform for organizing and presenting these items in a visually appealing manner.
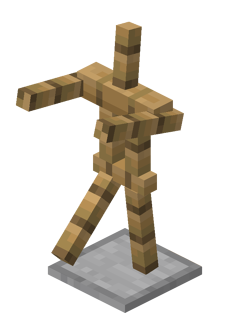
Armor stands can be crafted using a few basic materials, including six sticks and one smooth stone slab. Once crafted, they can be placed and manipulated to suit the player’s preferences. The stand itself resembles a wooden frame with a central pole and a platform on top where the armor or items can be placed.
Armor stands have several notable features and functions. They can hold and display armor, weapons, and various other items. Additionally, they can be customized and posed using commands, allowing players to create dynamic scenes and arrangements. Armor stands can also wear decorative blocks, such as pumpkins or player heads, giving them a unique and personalized touch.
These stands serve both practical and aesthetic purposes. From a practical standpoint, armor stands provide a convenient way to store and organize armor sets, ensuring quick access to different sets of equipment when needed. On the aesthetic side, they offer a way to showcase players’ achievements, collectibles, or simply add decorative elements to their Minecraft builds.
With the ability to pose, equip, and customize armor stands, players can unleash their creativity and create intricate displays, dioramas, or immersive scenes. Whether it’s recreating epic battles, setting up a museum-like exhibit, or simply adding a touch of elegance to a Minecraft home, armor stands offer endless possibilities for expression and personalization within the game.
Uses of Armor Stand in Minecraft
Armor stands in Minecraft serve a variety of practical and creative purposes. Here are some common uses of armor stands in the game:
- Displaying Armor and Weapons: One of the primary uses of armor stands is to showcase armor sets and weapons. By equipping the armor or placing weapons on the stand, players can create visually appealing displays of their collected gear.
- Organization: Armor stands provide a convenient way to organize and store armor sets. By placing different armor combinations on separate stands, players can easily access and switch between various sets for different situations, such as combat, exploration, or enchanting.
- Decoration: Armor stands can be used to enhance the aesthetics of Minecraft builds. They can serve as decorative elements in homes, castles, or other structures, adding a touch of realism and grandeur to the surroundings.
- Customization: With the use of commands, players can customize armor stands in various ways. They can change the pose of the stand, making it appear more dynamic or fit specific scenarios. Additionally, armor stands can wear decorative blocks, such as pumpkins, heads, or banners, allowing for further personalization and creative expression.
- Role-playing and Storytelling: Armor stands can be utilized to create immersive scenes and tell stories within the Minecraft world. By carefully posing multiple armor stands, players can recreate epic battles, depict characters in specific situations, or set up dioramas that contribute to the narrative of their gameplay.
- Redstone Contraptions: Armor stands can also be used in conjunction with redstone mechanisms to create complex contraptions. For example, they can be used as targets in shooting galleries, triggers for hidden mechanisms, or components in puzzle-solving mechanisms.
- Map Making: In the realm of Minecraft map making, armor stands are valuable tools for map creators. They can be used to indicate spawn points, provide visual cues, or act as placeholders for interactive elements in adventure maps.
The versatility of armor stands in Minecraft allows players to add functionality, organization, and creativity to their gameplay. They are not just mere decorative items but powerful tools for personalization and expression within the game’s virtual world.
Where to Find an Armor Stand
In Minecraft, you cannot directly find armor stands as items in the game world like you would with other resources. Instead, you have to craft them using the crafting table. Here’s how you can create an armor stand:
- Gather the necessary materials: You will need six sticks and one smooth stone slab.
- Craft the armor stand: Open the crafting table interface and arrange the materials in the following pattern:
- Place three sticks in the bottom row.
- Place one stick in the center of the middle row.
- Place one stick in the middle of the top row.
- Finally, place the smooth stone slab in the center of the crafting grid.
Once the items are correctly arranged, you will see the armor stand icon appear in the result slot of the crafting table. Simply click on it to collect the crafted armor stand.
Now that you have created an armor stand, you can place it wherever you want in your Minecraft world. It can be placed on the ground or even on top of other blocks to suit your design preferences. To place the armor stand, select it from your inventory, aim at the desired location, and right-click.
Remember that armor stands cannot be obtained through natural means like mining or looting. They must be crafted using the materials mentioned above.
Items You Need to Make Armor Stand
To craft an armor stand in Minecraft, you will need the following items:
- Sticks: You will need six sticks in total. Sticks can be obtained by crafting them from wooden planks. To craft sticks, place two wooden planks in a vertical arrangement in the crafting table, yielding four sticks. Repeat this process to acquire six sticks in total.
- Smooth Stone Slab: You will need one smooth stone slab. To craft a smooth stone slab, you first need to smelt cobblestone in a furnace. Place cobblestone in the top slot of the furnace and fuel (such as coal or charcoal) in the bottom slot. Once the cobblestone is smelted, you will receive smooth stone. Craft the smooth stone slab by placing three smooth stones in a horizontal row in the crafting table.
With these items in hand, you are ready to craft an armor stand. Simply open the crafting table and arrange the materials according to the pattern described in a previous response: three sticks in the bottom row, one stick in the center of the middle row, and one stick in the middle of the top row. Finally, place the smooth stone slab in the center of the crafting grid. Once the materials are arranged correctly, you can collect the crafted armor stand from the result slot of the crafting table.
By gathering sticks and smelting cobblestone, you can easily obtain the materials needed to create an armor stand and begin utilizing its functionalities in Minecraft.
Conclusion!
In conclusion, crafting an armor stand in Minecraft is a straightforward process that allows players to showcase their armor sets, weapons, and decorative items. By following a simple recipe and gathering the necessary materials, players can create this versatile entity in the game. To make an armor stand, you will need six sticks, which can be crafted from wooden planks, and one smooth stone slab, obtained by smelting cobblestone in a furnace.


