
Minecraft, the immensely popular sandbox game developed by Mojang Studios, offers players a vast virtual world to explore and create. However, as the game’s complexity increases with mods, resource packs, and larger worlds, it demands more system resources to ensure smooth gameplay. One crucial aspect that significantly impacts Minecraft’s performance is the allocation of RAM (Random Access Memory).
RAM serves as a temporary storage space for Minecraft, storing data required for the game to run smoothly. By default, Minecraft allocates a limited amount of RAM, which may lead to lag, longer loading times, and occasional crashes. To overcome these issues and optimize your Minecraft experience, allocating more RAM is necessary.
Allocating additional RAM to Minecraft allows the game to access a larger memory pool, improving performance and reducing the likelihood of performance-related issues. By following a few simple steps, you can ensure that Minecraft utilizes more RAM from your computer, leading to an enhanced and uninterrupted gaming experience.
Understanding RAM Allocation
RAM (Random Access Memory) is a vital component of your computer’s hardware that plays a crucial role in the performance of applications and games like Minecraft. When you allocate RAM to Minecraft, you are essentially designating a portion of your computer’s memory specifically for the game’s use. This allocation allows Minecraft to have more space to store and access important game data, resulting in improved performance and smoother gameplay.
How RAM Works:
RAM acts as a temporary storage area that stores data actively used by programs and the operating system. Unlike permanent storage devices like hard drives or solid-state drives (SSDs), RAM provides faster read and write speeds, enabling quicker access to data. This speed is essential for real-time applications like games, where data needs to be retrieved rapidly to maintain smooth gameplay.
The Importance of Allocating More RAM to Minecraft:
Minecraft is a resource-intensive game that relies heavily on system resources, particularly RAM. By default, Minecraft only allocates a certain amount of RAM, which may not be sufficient for more demanding gameplay scenarios. This can lead to lag, longer loading times, and even crashes, hindering your gaming experience.
By allocating more RAM to Minecraft, you can provide the game with additional memory, allowing it to handle larger worlds, mods, resource packs, and other demanding features more efficiently. The extra allocated RAM ensures that Minecraft has ample space to store and process the necessary data, resulting in smoother gameplay and improved performance.
RAM Allocation Limitations:
It’s important to note that there are limitations to how much RAM you can allocate to Minecraft, depending on your computer’s hardware and the operating system you’re using. For example, if you have a 32-bit version of Windows, you’ll be limited to around 4GB of RAM for all applications, including Minecraft.
Additionally, allocating too much RAM to Minecraft can have adverse effects. It may lead to inefficient resource management, causing the game to prioritize RAM usage over other critical system processes, resulting in decreased overall system performance.
In the next section, we’ll delve into checking your system requirements to ensure compatibility with allocating more RAM to Minecraft.
Checking System Requirements
Before proceeding with allocating more RAM to Minecraft, it’s crucial to ensure that your computer meets the necessary system requirements. Checking these requirements will help determine if your hardware and software configurations are compatible with allocating additional RAM. Here’s how you can check your system requirements:
Operating System and Version:
Make sure you are running a supported operating system for Minecraft. Check the official Minecraft website or Mojang Studios’ documentation to find the recommended operating system versions. Commonly supported operating systems include Windows, macOS, and Linux.
Bit Architecture:
Determine whether your operating system is 32-bit or 64-bit. To check this on Windows, go to the Control Panel, navigate to System and Security, and click on System. Look for the “System Type” field, which will indicate whether it’s a 32-bit or 64-bit operating system. For macOS, click on the Apple menu, select “About This Mac,” and check the “Processor” information.
RAM Capacity:
Verify the amount of RAM installed on your computer. On Windows, you can check this by going to the Control Panel, navigating to System and Security, and clicking on System. Look for the “Installed memory (RAM)” field to find the total RAM capacity. On macOS, click on the Apple menu, select “About This Mac,” and check the “Memory” information.
Minimum RAM Requirement:
Refer to the official Minecraft system requirements to determine the minimum RAM recommendation for the version of Minecraft you intend to play. This information can usually be found on the Minecraft website or in the game’s documentation.
Available RAM for Allocation:
Consider the amount of RAM you can allocate to Minecraft based on your computer’s total RAM capacity. It’s generally recommended to allocate around 4-8GB of RAM for optimal performance, depending on the mods, resource packs, and world size you use.
By checking these system requirements, you can ensure that your computer meets the necessary criteria for allocating more RAM to Minecraft. In the next section, we’ll explore the preparatory steps you need to take before making the allocation.
Allocating More RAM to Minecraft
Once you’ve confirmed that your system meets the necessary requirements, it’s time to allocate more RAM to Minecraft. Follow these step-by-step instructions to ensure a smooth and efficient allocation process:
Launcher Setup:
Start by opening the Minecraft Launcher on your computer. The Launcher is the program you use to access and launch Minecraft.
Profile Selection:
In the Launcher, navigate to the “Installations” or “Launch Options” tab, depending on the version of the Minecraft Launcher you have. Select the profile you want to allocate more RAM to from the list of available profiles. If you haven’t created a custom profile yet, you can create one specifically for allocating more RAM.
Edit Profile:
Click on the “Edit Profile” or “Edit” button related to the selected profile. This will open the profile settings window.
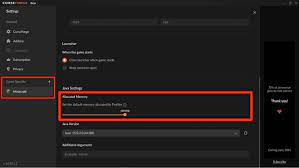
Allocate More RAM:
Within the profile settings window, locate the “JVM Arguments” or “Java Settings” option. This is where you can modify the RAM allocation for Minecraft.
Modify JVM Arguments:
In the JVM Arguments field, you’ll find a line of text that includes “-Xmx” followed by a number. This number represents the current allocated RAM for Minecraft. Increase this number to allocate more RAM. For example, if it’s currently set to “-Xmx2G” (2GB), you can change it to “-Xmx4G” (4GB) to allocate 4GB of RAM.
Specify RAM Size:
When increasing the RAM allocation, ensure that you don’t exceed the available memory on your system. It’s recommended to allocate around 4-8GB of RAM for optimal performance. Keep in mind that allocating too much RAM can have adverse effects on your overall system performance.
Save Changes:
After modifying the JVM Arguments, save the changes to the profile settings.
Launch Minecraft:
Close the profile settings window and click on the “Play” or “Launch” button in the Minecraft Launcher to start the game with the allocated RAM.
Verifying RAM Allocation
After allocating more RAM to Minecraft, it’s important to verify that the changes have been applied correctly. Here’s how you can verify the allocated RAM:
In-Game Verification:
Launch Minecraft and enter a world or create a new one. Once you’re in the game, press the F3 key (or Fn + F3 on some laptops) to open the debug screen. Look for the “Memory” section, which displays the allocated and used memory. Verify that the allocated memory matches the value you set in the JVM Arguments.
Task Manager (Windows):
On Windows, you can also use the Task Manager to monitor the RAM usage of Minecraft. Press Ctrl+Shift+Esc to open the Task Manager. In the “Processes” or “Details” tab, locate the Minecraft process. Verify that the “Memory (Private Working Set)” column shows the increased RAM allocation you set.
Activity Monitor (Mac):
For macOS users, you can use the Activity Monitor to check the RAM allocation. Open the Activity Monitor by going to Applications -> Utilities -> Activity Monitor. In the “Memory” tab, locate the Minecraft process. Verify that the “Memory” column displays the increased RAM allocation.
Performance Testing:
To further ensure that the allocated RAM is positively impacting Minecraft’s performance, play the game for a while. Monitor the gameplay for any improvements, such as reduced lag, faster loading times, and smoother overall performance. If you notice significant enhancements, it indicates that the increased RAM allocation is effectively optimizing your Minecraft experience.
Tips for Optimal Performance
Allocating more RAM to Minecraft is just one step towards optimizing its performance. Here are some additional tips to ensure an optimal gaming experience:
Update Java:
Make sure you have the latest version of Java installed on your computer. Minecraft heavily relies on Java, and updating to the latest version can improve compatibility and performance.
Optimize Graphics Settings:
Adjusting Minecraft’s graphics settings can significantly impact performance. Experiment with different settings, such as render distance, particle effects, and graphics quality, to find the right balance between visual appeal and performance.
Clear Temporary Files:
Regularly clear Minecraft’s temporary files and cache. These files can accumulate over time and impact game performance. You can use Minecraft’s built-in options or third-party tools to clean up temporary files.
Close Unnecessary Background Processes:
Close any unnecessary programs or applications running in the background while playing Minecraft. These processes consume system resources and can affect Minecraft’s performance.
Optimize System Settings:
Ensure that your computer’s power settings are optimized for performance rather than power saving. Adjust the settings to prioritize performance and prevent the system from entering sleep or hibernation mode during gameplay.
Disable Resource-Intensive Mods/Plugins:
If you’re using resource-intensive mods or plugins, consider disabling or optimizing them. Some mods may require a significant amount of system resources, affecting Minecraft’s performance. Evaluate and choose mods selectively to maintain optimal gameplay.
Allocate Sufficient Disk Space:
Ensure that you have enough free disk space on the drive where Minecraft is installed. Insufficient disk space can lead to performance issues and potential crashes.
Keep Drivers Updated:
Regularly update your computer’s graphics card drivers. Outdated drivers can cause compatibility issues and impact Minecraft’s performance. Visit the manufacturer’s website to download the latest driver updates.
Opt for Solid-State Drives (SSDs):
Consider using an SSD for storing and running Minecraft. SSDs offer faster read and write speeds compared to traditional hard drives, resulting in improved loading times and overall performance.
Conclusion
Allocating more RAM to Minecraft is a crucial step in optimizing its performance and ensuring a seamless gaming experience. By following the steps outlined in this guide, you can allocate additional memory to Minecraft and reduce lag, enhance loading times, and minimize crashes.
Understanding RAM allocation and checking your system requirements are vital initial steps. It’s important to ensure compatibility with your hardware and operating system before proceeding. Once confirmed, you can proceed with modifying the RAM allocation in the Minecraft Launcher’s profile settings.
Verifying the allocated RAM ensures that your changes have been applied correctly. By monitoring in-game memory usage or using system tools like Task Manager or Activity Monitor, you can confirm that Minecraft is utilizing the desired amount of RAM.


