
Welcome to the enchanting world of Minecraft, where players of all ages embark on extraordinary adventures in a boundless virtual realm. A significant aspect of this pixelated wonderland lies in its ability to adapt and transform to suit the imagination of its dedicated community. One such avenue of customization is the installation of texture packs, where the traditional blocky landscapes are revitalized with fresh, visually-stunning aesthetics.
Minecraft’s captivating gameplay revolves around building, crafting, and exploring, allowing players to create unique structures and landscapes limited only by their creativity. However, even the most die-hard Minecraft enthusiasts may desire a change from the game’s original visuals after countless hours of play. This is where texture packs come to the rescue, offering an exciting opportunity to inject new life into the familiar landscapes.
Texture packs serve as an artistic expression, showcasing the talents of the game’s dedicated fanbase. From medieval-inspired themes to futuristic designs and cartoonish art, the variety of texture packs available ensures that players can discover the perfect style to suit their preferences.
These packs meticulously replace the game’s default textures, replacing the iconic cubic appearance with a plethora of vibrant and imaginative alternatives. Whether seeking ultra-realistic environments that mirror the real world, whimsical worlds reminiscent of animated films, or dark and eerie dimensions, texture packs hold the key to transforming the very essence of Minecraft’s universe.
To embark on this visual voyage, players can explore a plethora of sources offering texture packs tailored to diverse tastes and interests. Reputable websites and official Minecraft forums host an extensive collection of these player-made masterpieces, each promising to deliver a unique journey through a revitalized Minecraft landscape.
Once a suitable texture pack has been discovered, the installation process is a breeze, breathing new life into the blocky realm in mere minutes. With a few simple clicks and the application of your chosen pack, your once-familiar surroundings become a mesmerizing work of art, creating a refreshing ambiance that revitalizes your passion for exploration and creation.
Whether you’re a seasoned Minecraft veteran or a newcomer to the blocky world, installing texture packs promises an immersive and visually captivating experience. So, venture forth, embrace the realm of possibilities that texture packs unveil, and unlock a newfound appreciation for the endless creative freedom that Minecraft has to offer.
How to Install Resource Packs in Minecraft – Windows

Installing resource packs in Minecraft on Windows is a simple process. Resource packs (also known as texture packs) allow you to customize the game’s visuals, sounds, and overall atmosphere. Here’s a step-by-step guide on how to install resource packs in Minecraft on a Windows computer:
- Choose a Resource Pack: First, browse reputable websites or Minecraft community forums to find a resource pack that suits your preferences. Consider the theme, style, and compatibility with your Minecraft version.
- Download the Resource Pack: After finding a resource pack you like, download it to your computer. Resource packs usually come in zip file format. Ensure you keep the file as-is without extracting its contents.
- Locate the Minecraft Folder: Press the Windows key + R to open the Run dialog box. Type
%appdata%\.minecraftand press Enter. This will take you to the Minecraft installation folder. - Access the Resourcepacks Folder: Within the Minecraft folder, locate the “resourcepacks” directory. This folder is where you’ll place the downloaded resource pack.
- Install the Resource Pack: Now, simply drag and drop the downloaded resource pack file directly into the “resourcepacks” folder. Alternatively, you can copy the resource pack and paste it into the folder.
- Launch Minecraft: Open the Minecraft Java Edition launcher on your Windows computer.
- Go to Resource Packs: In the Minecraft launcher, click on “Options” in the bottom right corner.
- Navigate to Resource Packs: From the Options menu, select “Resource Packs.” This will take you to the Resource Packs section of the game.
- Activate the Resource Pack: In the Resource Packs section, you’ll see a list of available packs. Find your newly installed resource pack in the “Available Resource Packs” list. Click the arrow icon next to the pack’s name to move it to the “Selected Resource Packs” section on the right.
- Adjust the Order (Optional): If you have multiple resource packs activated, you can adjust their order by clicking the arrow icons to move them up or down. Packs higher on the list take priority over those below, so make sure the one you want to use is on top.
- Done! Enjoy the Modified Experience: Once you’ve selected and organized your resource packs, click “Done” to return to the main Minecraft menu. The resource pack’s modifications will now be applied to your Minecraft world, offering you a personalized and visually captivating gaming experience.
With the resource pack installed, your Minecraft adventure will be transformed into a unique and immersive journey through a customized world tailored to your liking. Enjoy exploring the blocky landscapes with your new visuals and sounds!
How to Install Resource Packs in Minecraft – MacOS
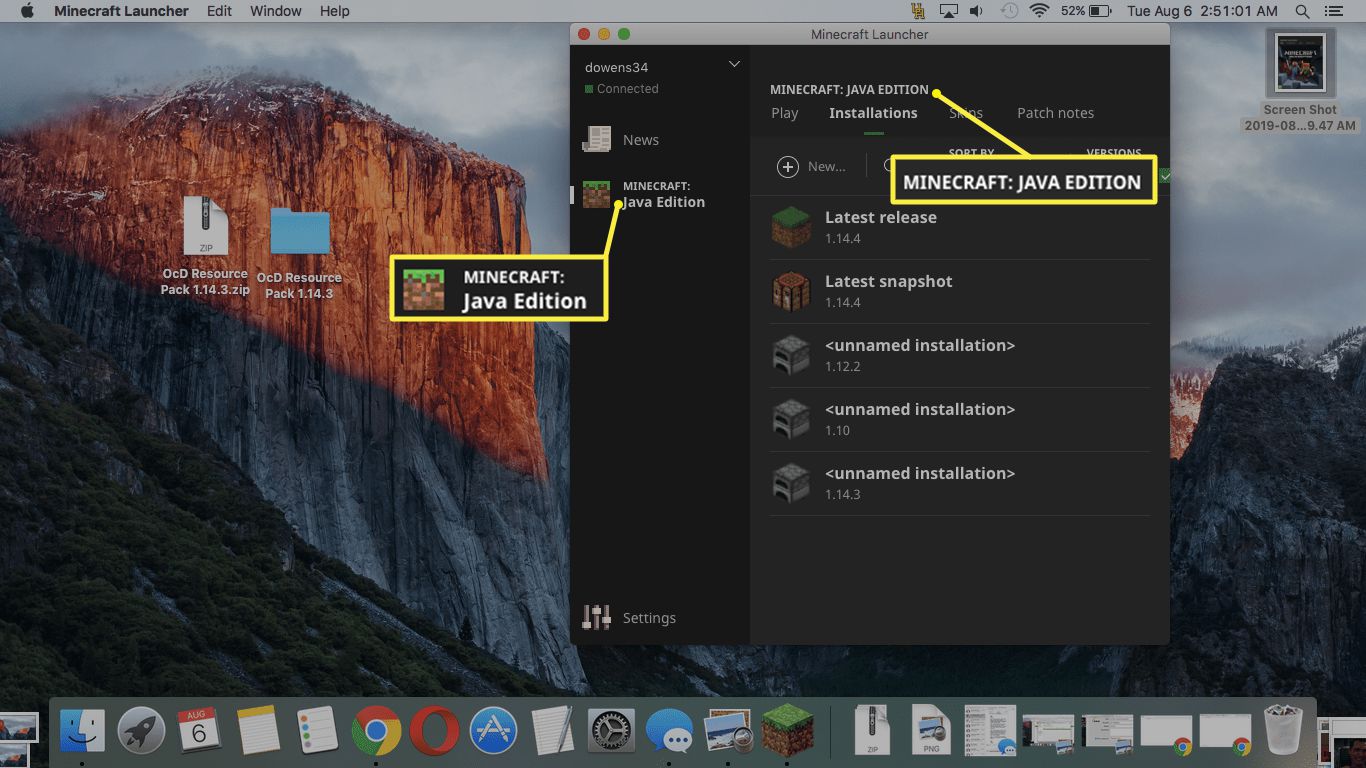
Installing resource packs in Minecraft on macOS is a straightforward process. Resource packs, also known as texture packs, allow you to modify the game’s visuals, sounds, and overall atmosphere, providing a personalized and captivating gaming experience. Here’s a step-by-step guide on how to install resource packs in Minecraft on a Mac:
- Choose a Resource Pack: Begin by browsing reputable websites or Minecraft community forums to find a resource pack that appeals to your preferences. Take into account the theme, style, and compatibility with your Minecraft version.
- Download the Resource Pack: After selecting a resource pack, download it to your Mac. Resource packs often come in zip file format. Make sure not to extract the contents of the zip file.
- Locate the Minecraft Folder: Open a Finder window and click on “Go” in the menu bar. While holding the “Option” key, select “Library.” In the Library folder, navigate to “Application Support” and then to “minecraft.”
- Access the Resourcepacks Folder: Within the minecraft folder, locate the “resourcepacks” directory. This folder is where you’ll place the downloaded resource pack.
- Install the Resource Pack: Drag and drop the downloaded resource pack file directly into the “resourcepacks” folder. Alternatively, you can copy the resource pack and paste it into the folder.
- Launch Minecraft: Open the Minecraft Java Edition launcher on your Mac.
- Go to Resource Packs: In the Minecraft launcher, click on “Minecraft” in the top menu bar, then select “Preferences.”
- Navigate to Resource Packs: In the Preferences window, click on “Resource Packs.” This will take you to the Resource Packs section of the game.
- Activate the Resource Pack: In the Resource Packs section, you’ll see a list of available packs. Find your newly installed resource pack in the “Available Resource Packs” list. Click the arrow icon next to the pack’s name to move it to the “Selected Resource Packs” section on the right.
- Adjust the Order (Optional): If you have multiple resource packs activated, you can adjust their order by clicking the arrow icons to move them up or down. Packs higher on the list take priority over those below, so make sure the one you want to use is on top.
- Done! Enjoy the Modified Experience: Once you’ve selected and organized your resource packs, close the Preferences window and click the “Play” button in the Minecraft launcher. The resource pack’s modifications will now be applied to your Minecraft world, offering you a personalized and visually captivating gaming experience.
With the resource pack installed, your Minecraft adventure will be transformed into a unique and immersive journey through a customized world tailored to your liking. Enjoy exploring the blocky landscapes with your new visuals and sounds!
How to Install Resource Packs in Minecraft – Linux
Installing resource packs in Minecraft on Linux is a straightforward process. Resource packs, also known as texture packs, allow you to customize the game’s visuals, sounds, and overall atmosphere, providing a unique and immersive gaming experience. Here’s a step-by-step guide on how to install resource packs in Minecraft on Linux:
- Choose a Resource Pack: Start by finding a resource pack that matches your preferences on reputable websites or Minecraft community forums. Consider the theme, style, and compatibility with your Minecraft version.
- Download the Resource Pack: Once you’ve selected a resource pack, download it to your Linux computer. Resource packs are often provided in zip file format. Do not extract the contents of the zip file.
- Locate the Minecraft Folder: Open a terminal window on your Linux system.
- Access the Minecraft Folder: In the terminal, enter the following command to navigate to the Minecraft installation directory:
cd ~/.minecraft
- Access the Resourcepacks Folder: Inside the
.minecraftfolder, locate the “resourcepacks” directory. This is where you will place the downloaded resource pack. - Install the Resource Pack: Move the downloaded resource pack file to the “resourcepacks” folder. You can do this using the terminal or your file manager. If you prefer using the terminal, use the “mv” command
mv /path/to/your/resource_pack.zip ~/.minecraft/resourcepacks/
- Launch Minecraft: Open the Minecraft Java Edition launcher on your Linux system.
- Go to Resource Packs: In the Minecraft launcher, click on “Options” in the bottom right corner.
- Navigate to Resource Packs: From the Options menu, select “Resource Packs.” This will take you to the Resource Packs section of the game.
- Activate the Resource Pack: In the Resource Packs section, you’ll see a list of available packs. Find your newly installed resource pack in the “Available Resource Packs” list. Click the arrow icon next to the pack’s name to move it to the “Selected Resource Packs” section on the right.
- Adjust the Order (Optional): If you have multiple resource packs activated, you can adjust their order by clicking the arrow icons to move them up or down. Packs higher on the list take priority over those below, so make sure the one you want to use is on top.
- Done! Enjoy the Modified Experience: Once you’ve selected and organized your resource packs, click “Done” to return to the main Minecraft menu. The resource pack’s modifications will now be applied to your Minecraft world, offering you a personalized and visually captivating gaming experience.
With the resource pack installed, your Minecraft adventure will be transformed into a unique and immersive journey through a customized world tailored to your liking. Enjoy exploring the blocky landscapes with your new visuals and sounds!
Conclusion!
Congratulations! You’ve successfully installed a resource pack in Minecraft, and now you’re ready to embark on a personalized and visually captivating adventure in the blocky world. With the resource pack enhancing your gameplay experience, your Minecraft world will be transformed, allowing you to explore and create in a unique and immersive environment that aligns perfectly with your preferences.
Resource packs offer a multitude of themes, styles, and designs, giving you the freedom to choose a world that resonates with your imagination. Whether you prefer a realistic and immersive atmosphere, a whimsical and cartoonish realm, or anything in between, resource packs cater to your creative desires, making each playthrough a fresh and engaging experience.


