
Minecraft, the wildly popular sandbox game, offers players a vast virtual world to explore and build in. Whether you’re embarking on epic adventures or constructing awe-inspiring structures, efficient transportation is essential. Rails play a pivotal role in creating a network of minecart tracks, allowing players to traverse their expansive realms with ease.
In this beginner’s guide, we will walk you through the process of making rails in Minecraft, providing step-by-step instructions to help you establish a seamless transportation system. From gathering essential resources to crafting basic and advanced rail types, we will cover all the fundamentals.
Whether you’re a novice player seeking basic rail knowledge or a seasoned builder looking to enhance your transportation infrastructure, this guide has got you covered. So grab your pickaxe, fire up your furnace, and let’s dive into the fascinating world of Minecraft rails!
1. What is Rails in Minecraft?
Rails in Minecraft are a type of block that players can use to construct minecart tracks, enabling efficient transportation within the game. Rails serve as the foundation for minecart systems, allowing players to ride minecarts and transport items across their virtual worlds.
Rails are crafted using iron ingots, which are obtained by smelting iron ore in a furnace. There are several types of rails available in Minecraft, each with its own unique properties and functions:
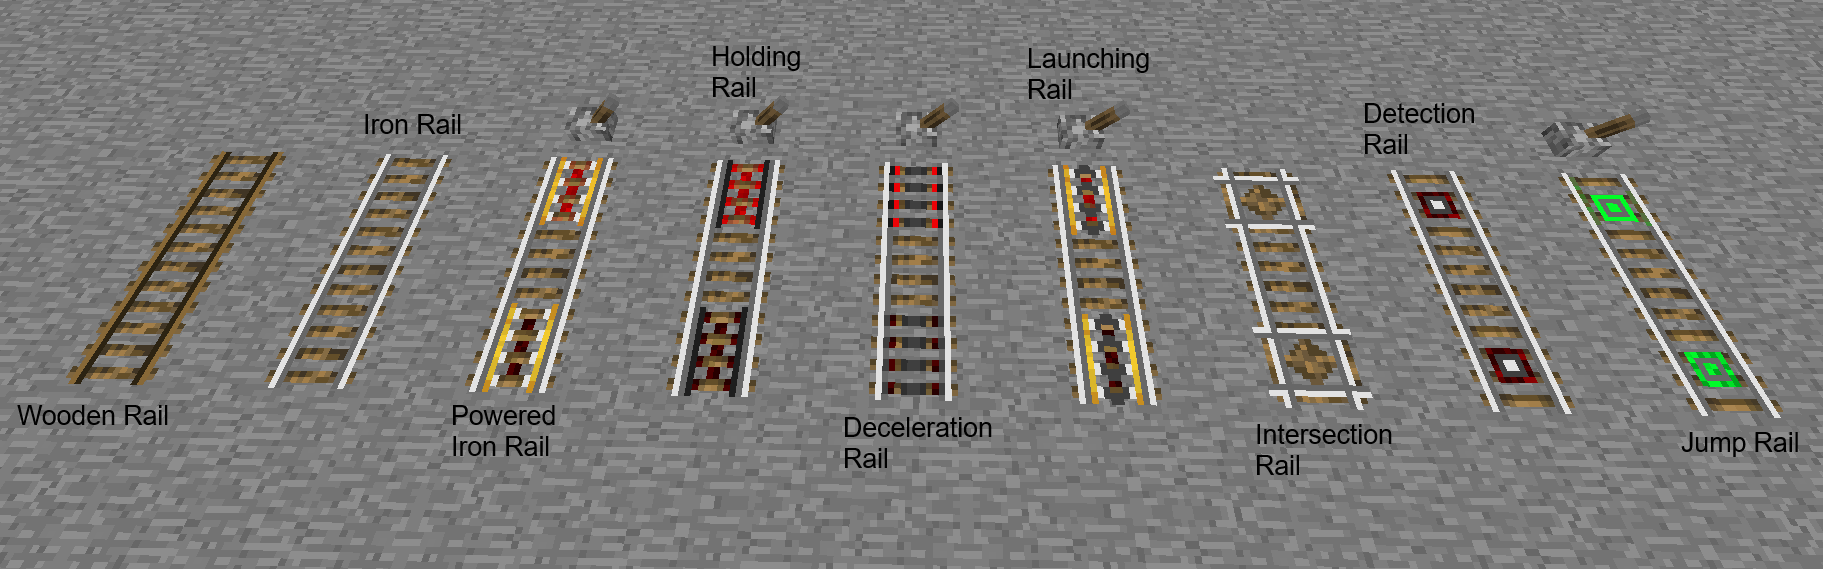
Normal Rails: These are the basic rails used to create straight tracks. They provide a stable path for minecarts to travel upon.
Powered Rails: Powered rails can be activated using a redstone signal, propelling minecarts forward at an increased speed. They are essential for creating boosters and maintaining momentum along the tracks.
Detector Rails: Detector rails emit a redstone signal when a minecart passes over them. They are often used in automated systems, triggering various mechanisms or signaling the presence of a minecart.
Activator Rails: Activator rails can be used to control and interact with minecarts. When powered by a redstone signal, they can activate or deactivate certain functionalities in a minecart, such as launching or stopping it.
By combining these different types of rails, players can design elaborate minecart networks, complete with junctions, slopes, and intersections. Rails provide a versatile and efficient means of transportation, allowing players to explore their Minecraft worlds with convenience and speed.
2. Understanding Rails in Minecraft
Understanding Rails in Minecraft is essential for creating efficient transportation systems and exploring the vast virtual world of the game. Rails serve as the building blocks for minecart tracks, enabling players to travel swiftly and conveniently across long distances.
To delve deeper into the concept, let’s explore the following aspects:
Basic Function:
Rails provide a stable path for minecarts, which can be ridden by players or used to transport items. They allow for smooth movement and prevent minecarts from derailing or getting stuck.
Crafting:
Rails are crafted using iron ingots. Players need to mine iron ore, smelt it in a furnace to obtain iron ingots, and then use these ingots to craft rails.
Types of Rails:
- a. Normal Rails: These are the standard rails used to create straight tracks. They are the foundation of any rail network and provide a basic means of transportation.
- b. Powered Rails: Powered rails, when powered by a redstone signal, propel minecarts forward, increasing their speed. They are crucial for boosting minecart momentum and maintaining faster travel.
- c. Detector Rails: Detector rails emit a redstone signal when a minecart passes over them. They are often used in automation systems, triggering various mechanisms or signaling the presence of minecarts.
- d. Activator Rails: Activator rails, when powered by a redstone signal, can activate or deactivate specific functionalities in a minecart, such as launching or stopping it.
Building Track Systems:
Rails can be combined and arranged in various configurations to create intricate track systems. Players can design straight tracks, curves, slopes, junctions, intersections, and loops to customize their transportation network.
Redstone Integration:
Redstone, a Minecraft power source, can be used to control and automate rail systems. Redstone torches, repeaters, and other redstone components can be utilized to create switches, signals, and even complex railway circuits.
3. Gathering Essential Resources
Gathering essential resources is the first step towards creating rails in Minecraft. Here are the key resources you’ll need to collect:
- Iron Ore: Iron ore is the primary resource required for crafting rails. It is commonly found underground in caves, ravines, and mineshafts. Use a pickaxe to mine iron ore blocks.
- Wooden Logs: You will need wooden logs to craft sticks, which are essential for rail construction. Cut down trees using an axe to gather a sufficient supply of wooden logs.
- Coal or Charcoal: Coal or charcoal is used as fuel for smelting iron ore into iron ingots. Coal can be obtained by mining coal ore blocks found underground or by killing certain mobs. Alternatively, charcoal can be crafted by smelting logs in a furnace.
- Crafting Table: To craft rails and other items, you’ll need a crafting table. It can be crafted using wooden planks obtained from wooden logs.
- Furnace: A furnace is required to smelt iron ore into iron ingots. Craft a furnace using eight cobblestone blocks.
4. Crafting Basic Rails
Crafting basic rails in Minecraft is a straightforward process. Follow these steps to create the foundation of your rail network:
- Open Crafting Table: Right-click on a crafting table to open the 3×3 crafting grid.
- Place Iron Ingots: In the crafting grid, place six iron ingots in two horizontal rows. Each row should contain three iron ingots. This recipe yields 16 basic rails.
- Retrieve Basic Rails: Once you have placed the iron ingots in the correct pattern, the 16 basic rails will appear in the result box of the crafting table.
- Collect Basic Rails: Click on the basic rails in the result box to collect them. They will be added to your inventory.
5. Expanding Your Rail Network
Expanding your rail network in Minecraft allows you to create a more intricate and efficient transportation system. Here are the steps to follow when expanding your rail network:
Crafting Powered Rails:
To increase the speed and momentum of minecarts, craft powered rails. You will need six gold ingots and one stick.
Open the crafting table and place three gold ingots across the bottom row, with the stick in the center box.
Retrieve the powered rails from the result box.
Crafting Detector Rails:
- Detector rails can be used to detect the presence of minecarts and trigger redstone signals. You will need six iron ingots, one stone pressure plate, and one redstone dust.
- Place three iron ingots across the top row, one stone pressure plate in the center box, and one redstone dust in the bottom box.
- Collect the detector rails from the result box.
Crafting Activator Rails:
- Activator rails enable interaction with minecarts, allowing you to launch or stop them. You will need six iron ingots, one stick, and one redstone torch.
- Place three iron ingots across the top row, one stick in the center box, and one redstone torch in the bottom box.
Retrieve the activator rails from the result box.
Placing Rails:
- Determine the direction and path of your rail network expansion.
- Place rails on the ground or on blocks by right-clicking in the desired locations.
- Use combinations of straight tracks, curves, slopes, and junctions to create a diverse rail system.
- Boosting Speed and Efficiency:
Incorporate powered rails strategically to boost the speed of minecarts. Place them at intervals to maintain momentum.
Connect powered rails with redstone torches or redstone dust to power them and propel minecarts forward.
Junctions and Intersections:
To create junctions and intersections, design track configurations that allow minecarts to switch paths.
Utilize detector rails and redstone mechanisms to control the direction of the tracks and manage traffic flow.
Redstone Automation:
- Implement redstone circuitry to automate your rail network.
- Use redstone torches, repeaters, and comparators to create switches, signals, and timed mechanisms.
6. Building Track Systems
Building track systems in Minecraft allows you to create intricate and customizable routes for your minecarts. Here are the steps to follow when constructing track systems:
Laying Down the Tracks:
- Determine the path and layout of your track system. Plan for straight sections, curves, slopes, and any desired junctions or intersections.
- Place the tracks by right-clicking on blocks or the ground where you want them to be positioned. Ensure they connect seamlessly to form a continuous path.
Creating Curves and Slopes:
- To create curved tracks, select the desired curved track item from your inventory and right-click on an existing track. Repeat this process to form a smooth curve.
- To construct slopes, position tracks on an incline by placing them on blocks at different elevations. Ensure the tracks align properly to allow minecarts to move smoothly.
Implementing Junctions and Intersections:
- To create junctions, where tracks diverge or merge, use track switches or combinations of curved tracks and straight tracks.
- Place track switches at the desired locations to allow minecarts to change direction. Activate the switches using redstone mechanisms for automated control.
Incorporating Booster Rails for Increased Speed:
- To boost the speed of minecarts, incorporate powered rails at regular intervals along the track system.
- Place powered rails on blocks or the ground, and power them using redstone torches or redstone dust.
- Ensure there is enough momentum for minecarts to travel smoothly between powered rails, maintaining a consistent speed.
Testing and Refining:
- Test your track system by riding a minecart along the tracks. Observe any areas where minecarts slow down, get stuck, or derail.
- Make adjustments as needed, such as adding additional powered rails for speed, repositioning tracks for smoother curves, or adjusting slopes for seamless movement.
Aesthetic Considerations:
Add decorative elements to enhance the visual appeal of your track system. Consider incorporating tunnels, bridges, or landscaping features along the tracks.
Experiment with different block types, colors, and lighting to create a visually pleasing and immersive experience.
7. Advanced Rail Features
Advanced rail features in Minecraft add complexity and functionality to your rail network. These features include powered rails, detector rails, activator rails, and redstone automation. Here’s a closer look at each of these advanced rail features:
Powered Rails:
- Powered rails increase the speed of minecarts and help them maintain momentum.
- Place powered rails at regular intervals along your track system to ensure smooth and fast transportation.
- To power the rails, either provide a redstone signal directly to them or connect them to a redstone circuit.
Detector Rails:
- Detector rails can detect the presence of minecarts and emit a redstone signal.
- Use detector rails in automated systems, such as activating doors or triggering redstone mechanisms.
- When a minecart passes over a detector rail, it can activate connected redstone components.
Activator Rails:
- Activator rails interact with minecarts, providing various functionalities.
- When powered by a redstone signal, activator rails can launch or stop minecarts.
- Use activator rails to create launching mechanisms, trapdoors, or even to dispense or pick up items from passing minecarts.
Redstone Automation:
- Redstone circuits allow for advanced automation and control of your rail network.
- Use redstone torches, repeaters, comparators, and other redstone components to create switches, signals, and timing mechanisms.
- Automate track switches, create traffic control systems, or build minecart stations with the help of redstone.
Minecart Storage and Dispensing Systems:
- Design storage and dispensing systems using hopper minecarts, chests, and powered rails.
- Utilize hopper minecarts to collect items from passing minecarts and transport them to chests or other containers.
- Create automated item sorting systems or loading stations for efficient item transportation.
Powered Furnace Minecarts:
- Combine a furnace minecart with coal or charcoal to create a powered furnace minecart.
- Powered furnace minecarts can smelt items while in motion, allowing for on-the-go smelting and item processing.
- Use them to create mobile smelting stations or for automatic smelting of raw materials.
In Conclusion
building and expanding a rail network in Minecraft adds a new dimension of convenience, efficiency, and creativity to your gameplay experience. Rails serve as the backbone of transportation, allowing you to traverse vast distances, transport items, and explore your virtual world with ease.
From crafting basic rails using iron ingots to incorporating advanced features like powered rails, detector rails, and activator rails, you can design intricate track systems that cater to your specific needs. By strategically placing tracks, creating curves, slopes, and junctions, and implementing booster rails for increased speed, you can construct a versatile and functional rail network that connects various locations within your Minecraft realm.


