
Minecraft, the beloved sandbox game that has captured the hearts of millions, offers endless possibilities and adventures in its pixelated world. However, as your Minecraft experience becomes more complex with resource packs, mods, and intricate builds, you may encounter performance issues such as lag, slow loading times, and stuttering. Fortunately, one effective solution to optimize Minecraft’s performance is to allocate more RAM to the game.
RAM (Random Access Memory) plays a crucial role in Minecraft’s performance as it stores and quickly accesses the game’s data during gameplay. By default, Minecraft allocates a certain amount of RAM to its Java Virtual Machine (JVM). However, this allocation may not be sufficient for more demanding gameplay, resulting in suboptimal performance.
In this comprehensive guide, we will walk you through the step-by-step process of allocating more RAM to Minecraft, ensuring that your game runs smoothly and efficiently. We will also explore the reasons why RAM allocation is crucial for Minecraft’s performance and provide additional tips for optimizing your Minecraft experience.
Why Allocating More RAM to Minecraft Matters for Performance
Minecraft, with its vast and immersive world, has captivated millions of players around the globe. However, as you dive deeper into the game, adding mods, texture packs, and embarking on ambitious builds, you may start experiencing performance issues. Lag, slow loading times, and stuttering can hinder your gameplay and diminish the overall experience. This is where allocating more RAM to Minecraft becomes crucial.
RAM, or Random Access Memory, is a vital component in determining how well Minecraft runs on your computer. It acts as a temporary storage space for the game’s data, allowing for quick access and seamless gameplay. By default, Minecraft allocates a certain amount of RAM to its Java Virtual Machine (JVM). However, this allocation may not be sufficient for more resource-intensive gameplay.
When you allocate more RAM to Minecraft, you provide the game with additional memory to work with. This extra space allows for smoother rendering, faster chunk loading, and improved overall performance. With more RAM at its disposal, Minecraft can handle complex mods, higher-resolution textures, and larger worlds without sacrificing performance.
Checking System Requirements and Available RAM
Before diving into the process of allocating more RAM to Minecraft, it’s essential to assess your system requirements and determine the available RAM on your computer. This information will help you ensure that your system can handle the increased RAM allocation for optimal performance.
System Requirements:
Minecraft has specific system requirements that you need to meet to ensure smooth gameplay. These requirements can vary depending on the Minecraft edition you’re playing (Java or Bedrock) and the version of the game. Visit the official Minecraft website or consult the documentation to find the recommended system requirements for your specific setup.
Determining Available RAM:
To check the amount of RAM available on your computer, follow these steps:
a. Windows:
- Press the Windows key + R to open the Run dialog box.
- Type “dxdiag” and press Enter.
- The DirectX Diagnostic Tool will open. Go to the “System” tab.
- Look for the “Installed Memory” or “RAM” field. It will display the total amount of RAM installed on your system.
b. macOS:
- Click the Apple menu in the top-left corner and select “About This Mac.”
- In the window that appears, go to the “Memory” tab.
- The “Memory” section displays the total amount of RAM installed on your Mac.
c. Linux:
- Open a terminal window.
- Enter the command “free -h” and press Enter.
- The output will show the total amount of available RAM in your Linux system.
Ensure that you have at least 4GB of available RAM for optimal performance when allocating more memory to Minecraft. If you have less than 4GB, consider closing unnecessary applications or upgrading your RAM for a smoother Minecraft experience.
Understanding the Importance of RAM Allocation for Minecraft
RAM (Random Access Memory) allocation plays a vital role in determining the performance of Minecraft. When it comes to running resource-intensive games like Minecraft, proper allocation of RAM is crucial for optimal gameplay and a smooth gaming experience. Here’s why RAM allocation matters:
Memory for Game Processes:
Minecraft, particularly the Java edition, operates on Java Virtual Machine (JVM), which requires a dedicated amount of RAM to run smoothly. Allocating an adequate amount of RAM ensures that the JVM has enough memory to handle the game’s processes efficiently. This includes tasks like rendering the game world, loading chunks, managing mods, and handling in-game calculations.
Enhanced Performance:
Allocating more RAM to Minecraft allows the game to utilize additional memory for caching and storing game data. This results in improved performance, reduced lag, and faster loading times. With sufficient RAM, Minecraft can handle larger and more complex worlds, higher-resolution textures, and intensive mods without encountering performance bottlenecks.
Stability and Reduced Crashes:
Insufficient RAM allocation can lead to instability and crashes within Minecraft. When the allocated RAM is insufficient to handle the game’s demands, the JVM may struggle to process data effectively, leading to crashes or freezing. By allocating more RAM, you provide Minecraft with the necessary resources to operate smoothly, minimizing the chances of crashes and instability.
Mod and Texture Pack Compatibility:
Minecraft’s thriving modding community offers a plethora of mods and texture packs that enhance gameplay and visuals. Many mods require additional memory to function properly, especially those with complex features or extensive world generation. By increasing RAM allocation, you ensure compatibility with a broader range of mods and texture packs, allowing you to explore new possibilities within the game.
Multiplayer Performance:
When playing Minecraft multiplayer, allocating more RAM becomes even more critical. Multiplayer sessions involve additional players, increased entity interactions, and potentially larger worlds, all of which require extra memory. Allocating sufficient RAM helps maintain smooth gameplay, reducing latency and ensuring an enjoyable multiplayer experience.
Understanding the importance of RAM allocation in Minecraft enables you to optimize your gaming setup for better performance and stability. In the following sections, we will provide you with a step-by-step guide to allocate more RAM to Minecraft, empowering you to unleash the full potential of the game.
Step-by-Step Guide to Allocating More RAM to Minecraft
Allocating more RAM to Minecraft is a straightforward process that involves modifying the Java arguments in the Minecraft Launcher. Follow these step-by-step instructions to increase the allocated RAM and optimize Minecraft’s performance:
Launch the Minecraft Launcher:
Open the Minecraft Launcher on your computer. If you don’t have it installed, download it from the official Minecraft website (https://www.minecraft.net).
Select the Minecraft Version:
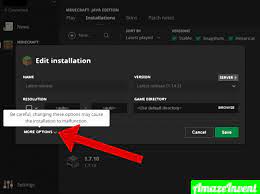
In the launcher, click on the “Installations” tab located at the top. Here, you’ll see a list of installed Minecraft versions. Select the version you want to allocate more RAM to by clicking on it.
Access Additional Options:
After selecting the desired version, click on the “More Options” or “Edit” button next to it. This will open the configuration options for that specific Minecraft version.
Modify JVM Arguments:
In the configuration options, locate the “JVM Arguments” field. This field contains the command-line arguments used by the Java Virtual Machine when running Minecraft. Look for the line that starts with “-Xmx” followed by a value representing the allocated RAM.
Increase Allocated RAM:
Modify the value after “-Xmx” to increase the allocated RAM. You can specify the amount of RAM using “G” for gigabytes or “M” for megabytes. For example, “-Xmx4G” allocates 4GB of RAM to Minecraft. It is recommended to allocate a reasonable amount of RAM based on your system capabilities, keeping in mind that other applications also require memory to run smoothly.
Save Changes:
After adjusting the allocated RAM, save the changes in the launcher by clicking the “Save” or “Apply” button.
Launch Minecraft:
Close the configuration options and go back to the Minecraft Launcher’s main screen. Select the Minecraft version you modified, and click the “Play” button to launch the game.
Once Minecraft launches, it will utilize the increased amount of RAM you allocated. To confirm the changes, you can check the debug screen in Minecraft (press F3) and ensure that the allocated memory matches the value you set.
Verifying RAM Allocation Changes in Minecraft
After allocating more RAM to Minecraft, it’s important to verify that the changes have taken effect. Here’s how you can confirm the RAM allocation in Minecraft:
Launch Minecraft:
Open the Minecraft Launcher and select the version of Minecraft you allocated more RAM to. Click the “Play” button to launch the game.
Enter a World:
Once Minecraft has launched, enter any world or create a new one. It’s recommended to choose a world with a decent amount of structures or loaded chunks to better observe the RAM usage.
Open the Debug Screen:
Press the F3 key (or Fn + F3 on some laptops) to open the debug screen. This screen displays various information about the game, including the allocated memory.
Check the Memory Section:
Within the debug screen, locate the “Memory” section. It should provide details about the memory usage in Minecraft.
Verify Allocated Memory:
In the “Memory” section, look for the “Allocated” or “Allocated Memory” field. This value indicates the amount of RAM allocated to Minecraft.
If the allocated memory matches the value you set during the RAM allocation process, it means that Minecraft is successfully utilizing the increased RAM.
If the allocated memory doesn’t match the expected value, double-check the changes you made in the Minecraft Launcher’s configuration options. Ensure that you saved the modifications and relaunch Minecraft.
By verifying the RAM allocation changes in Minecraft, you can confirm that the game is utilizing the intended amount of memory. This step ensures that you have successfully optimized Minecraft’s performance by allocating more RAM, allowing for smoother gameplay, reduced lag, and improved overall stability.
Additional Tips for Optimizing Minecraft Performance
In addition to allocating more RAM to Minecraft, there are several other optimizations you can implement to further enhance the game’s performance. Consider these additional tips to maximize your Minecraft experience:
Use Optifine or Performance Mods:
Optifine is a popular mod that enhances Minecraft’s performance by optimizing graphics, reducing lag, and providing additional customization options. Install Optifine or other performance mods compatible with your Minecraft version to boost FPS (frames per second) and overall gameplay smoothness.
Update Java and Minecraft:
Ensure that you have the latest versions of both Java and Minecraft installed. Updating to the latest releases can often introduce performance improvements and bug fixes, enhancing the stability and efficiency of the game.
Optimize Video Settings:
Adjusting video settings within Minecraft can have a significant impact on performance. Lowering render distance, turning off fancy graphics, adjusting particles, and disabling VSync can improve FPS and reduce lag. Experiment with different settings to find the right balance between visuals and performance.
Clear Unnecessary Resource Packs and Mods:
If you have resource packs and mods that you no longer use or need, remove them from your Minecraft installation. Having fewer resource packs and mods can reduce the game’s memory and processing requirements, resulting in improved performance.
Close Background Applications:
Close any unnecessary applications running in the background while playing Minecraft. Other programs consuming system resources can compete with Minecraft for RAM and processing power, potentially causing performance issues.
Allocate More System RAM:
Apart from allocating more RAM to Minecraft, consider upgrading your system’s RAM capacity if possible. Having more overall system memory allows for smoother multitasking and can provide additional resources for Minecraft to utilize.
Optimize System Performance:
Regularly perform system maintenance tasks such as disk cleanup, defragmentation, and updating drivers. Keeping your system optimized can improve overall performance, benefiting Minecraft as well.
Use a Lightweight Resource Pack:
Choose a resource pack with a smaller file size or lower resolution. High-resolution texture packs can consume more memory and impact performance. Opting for a lightweight resource pack can help maintain smooth gameplay.
By implementing these additional tips, you can optimize Minecraft’s performance and ensure a seamless and enjoyable gaming experience. Remember to experiment with different settings and optimizations to find the configuration that works best for your specific hardware and preferences.
Conclusion
Allocating more RAM to Minecraft is a simple yet effective way to optimize the game’s performance and enhance your overall gaming experience. By providing Minecraft with additional memory, you allow it to handle resource-intensive mods, high-resolution textures, and larger worlds without encountering performance issues such as lag or freezing.
In this guide, we discussed the importance of RAM allocation for Minecraft, emphasizing how it allows the game to process data more efficiently and improves stability. We provided a step-by-step process for allocating more RAM through the Minecraft Launcher, ensuring that you can easily adjust the allocated memory to suit your system’s capabilities.
Furthermore, we explored the significance of verifying the RAM allocation changes within Minecraft and provided tips for optimizing performance beyond RAM allocation. Suggestions such as using performance mods, updating Java and Minecraft, optimizing video settings, and clearing unnecessary resource packs or mods can further enhance your gameplay.


