
Minecraft, the renowned sandbox video game, has captivated millions of players worldwide with its boundless creativity and infinite possibilities. While indulging in the immersive gameplay provided by the official Minecraft servers is undeniably enjoyable, many players yearn for a more personalized and customizable experience. This desire has led to the rise in popularity of hosting private Minecraft servers, allowing players to create their own virtual worlds, invite friends, and explore unique modifications and plugins.
In this comprehensive guide, we will walk you through the process of hosting a Minecraft server, empowering you to establish a virtual realm tailored to your preferences. Whether you aspire to create a thriving community, embark on exciting adventures with friends, or simply explore limitless creativity, this guide will equip you with the knowledge and tools to transform your vision into reality.
To embark on this journey, you will need a reliable computer or dedicated server capable of handling the demands of hosting a Minecraft server. We will delve into the hardware and software requirements, ensuring you have the necessary resources to provide a seamless and lag-free experience for your players.
Next, we will explore the various server hosting options available, ranging from self-hosting on your personal computer to utilizing dedicated hosting services. Each option comes with its own advantages and considerations, and we will outline the pros and cons of each to help you make an informed decision.
Once you have chosen a hosting method, we will guide you through the installation and configuration process, demystifying the steps involved in setting up a Minecraft server. From selecting the desired Minecraft version to adjusting server settings and enabling essential security measures, we will ensure you have a solid foundation for your server.
Furthermore, we will discuss the importance of selecting and installing plugins and modifications, enabling you to enhance gameplay, add exciting features, and customize the Minecraft experience according to your preferences.
Lastly, we will touch upon the critical aspect of server administration, equipping you with the knowledge to manage and maintain your Minecraft server effectively. From understanding server logs and troubleshooting common issues to implementing backups and ensuring optimal performance, you will be equipped to provide a smooth and enjoyable experience for your players.
By the end of this guide, you will have the expertise to host your own Minecraft server and embark on a journey of limitless creativity and adventure. So, let’s dive in and unlock the doors to a world of endless possibilities in Minecraft!
What are the basic system requirements of a Minecraft server?
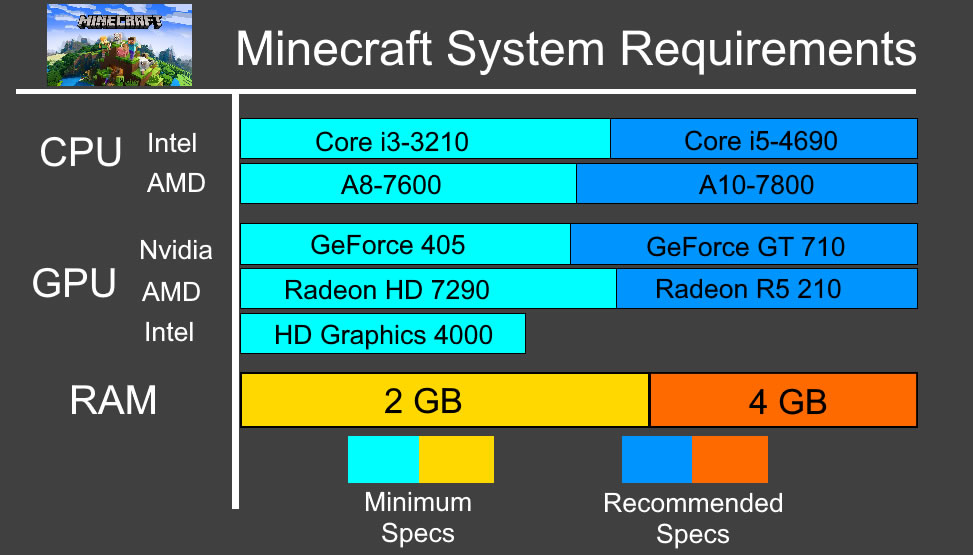
To host a Minecraft server, you’ll need a computer or a dedicated server that meets the basic system requirements. Here are the key components to consider:
- Processor (CPU): Minecraft relies heavily on the CPU, so it’s crucial to have a capable processor. A multi-core processor, such as Intel Core i5 or AMD Ryzen 5, is recommended for smoother performance, especially if you plan to host a server with multiple players.
- Memory (RAM): Sufficient RAM is vital for running a Minecraft server. The more players and modifications you have, the more RAM you’ll need. A minimum of 4 GB of RAM is typically recommended for small servers, but for larger servers with more players and extensive modifications, 8 GB or more is advisable.
- Storage (HDD/SSD): Minecraft server files and game data can consume significant storage space over time. While a hard disk drive (HDD) can work, using a solid-state drive (SSD) provides faster read/write speeds, resulting in quicker loading times and improved performance.
- Operating System: Minecraft servers can be hosted on various operating systems, including Windows, macOS, and Linux. Choose an operating system that you are comfortable with and one that is compatible with Minecraft server software.
- Internet Connection: A stable and reliable internet connection with adequate upload and download speeds is essential. Higher bandwidth ensures smoother gameplay and reduced latency for players connecting to your server.
- Network Router and Port Forwarding: If you plan to host the server from your home network, you will need to configure port forwarding on your router to allow external connections to reach your Minecraft server. Consult your router’s documentation or seek online resources for guidance on setting up port forwarding.
It’s important to note that these requirements can vary depending on the size of your server and the number of players. If you anticipate hosting a large community or running extensive modifications, you may need more powerful hardware to ensure optimal performance.
By considering these basic system requirements and ensuring your hardware meets or exceeds them, you’ll be well on your way to setting up a stable and enjoyable Minecraft server for yourself and your friends or community.
Which IONOS server is the right choice for your Minecraft server?
IONOS offers various server options that can be suitable for hosting a Minecraft server, depending on your specific requirements. Here are a few IONOS server options to consider:
- Cloud Server: IONOS Cloud Server provides flexibility and scalability, allowing you to customize the server resources according to your needs. You can choose the amount of CPU cores, RAM, and storage space required for your Minecraft server. With the ability to scale up or down as needed, it is an excellent option for accommodating varying player counts and resource demands.
- Dedicated Server: IONOS Dedicated Server offers high-performance hardware dedicated solely to your Minecraft server. With powerful processors, ample RAM, and fast storage options, dedicated servers ensure optimal performance and stability. This option is suitable for larger Minecraft communities or servers that require robust resources and customization options.
- VPS (Virtual Private Server): IONOS VPS provides a virtualized environment where you have dedicated resources within a shared physical server. It offers a balance between cost-effectiveness and performance. Depending on the VPS package you choose, you can adjust the CPU, RAM, and storage to meet your Minecraft server’s requirements.
When selecting an IONOS server for your Minecraft server, consider the expected player count, desired performance, and resource. Assess the CPU, RAM, and storage options available with each server type to ensure they meet the requirements of your Minecraft server. Additionally, consider factors like network connectivity, bandwidth, and support options provided by IONOS.
It is recommended to review the specifications and pricing details of each server option, as well as any additional features or services offered by IONOS, to make an informed decision that aligns with your budget and Minecraft server needs.
Setting Up a Host Server for Java Edition
Setting up a host server for Minecraft Java Edition involves several steps. Here’s a general guide to help you through the process:
- Choose a Hosting Provider: Select a reliable hosting provider that offers Minecraft server hosting services. Some popular options include Apex Hosting, Shockbyte, and BisectHosting. Consider factors like pricing, server locations, customer support, and reviews when making your decision.
- Choose a Hosting Plan: Review the hosting plans offered by the provider and choose one that suits your needs. Consider factors such as the number of players, server performance, available RAM, storage capacity, and any additional features offered.
- Purchase and Set Up the Server: Sign up for the hosting plan that best fits your requirements and complete the purchase. You will typically receive login details or a control panel link to manage your server.
- Access the Server Control Panel: Log in to the server control panel provided by the hosting provider. This panel allows you to configure and manage your Minecraft server.
- Install Minecraft Java Edition: If you haven’t already, purchase and download Minecraft Java Edition from the official Minecraft website (minecraft.net). Install the game on your personal computer.
- Configure Server Settings: In the server control panel, locate the server settings or configuration files. Customize parameters such as server name, game mode, difficulty level, whitelist, and more according to your preferences. You may also set the server’s maximum player count.
- Start the Server: Start your Minecraft server through the control panel. The server will begin the initialization process, and you should see log messages indicating its status.
- Customize Plugins and Mods: If desired, add plugins or mods to enhance your server’s functionality and gameplay. Research and install plugins compatible with your server version and ensure they are properly configured.
- Configure Server Access: Adjust server access settings to control who can join your server. Set up a whitelist, password, or utilize other authentication methods to manage player access.
- Invite Players: Share the server IP address or hostname with your friends or community members to allow them to connect. Provide instructions on how to join, including any necessary login information.
- Administer and Maintain the Server: Regularly monitor the server for performance, address any issues, and keep plugins, mods, and the server software up to date. Consider setting up automated backups to protect your server data.
Remember, each hosting provider may have specific instructions or variations in their control panel interface. Consult the provider’s documentation or support resources for detailed guidance tailored to their services.
By following these steps, you should be able to set up a hosted server for Minecraft Java Edition and embark on a thrilling multiplayer adventure with your friends and community.
Conclusion!
Hosting your own Minecraft server opens up a world of possibilities, allowing you to create a personalized gaming experience, invite friends to join, and explore limitless creativity. Throughout this guide, we have provided you with the essential knowledge and steps to successfully host a Minecraft server.
We started by discussing the basic system requirements, highlighting the importance of a capable processor, sufficient RAM, and reliable storage. Understanding these requirements ensures a smooth and enjoyable server experience for both you and your players.


