
Minecraft, the immensely popular sandbox game developed by Mojang Studios, offers endless possibilities for creativity and exploration. One of the key factors contributing to Minecraft’s success is its vast modding community, which provides players with a wide range of modifications to enhance their gameplay experience. To unlock the full potential of Minecraft mods, players often turn to Forge, a powerful modding platform that simplifies the installation and management of mods. In this guide, we will walk you through the step-by-step process of installing Forge in Minecraft, enabling you to enjoy an extensive collection of mods and expand your Minecraft universe.
Before we delve into the installation process, it’s important to grasp the significance of Forge and its role in the Minecraft modding ecosystem. Forge serves as a modding API (Application Programming Interface) that provides developers with the tools necessary to create and integrate mods seamlessly. With Forge installed, players can easily add, remove, and update mods without compromising the stability of their Minecraft installation. It acts as a bridge between the game and the modifications, ensuring compatibility and enhancing the overall gameplay experience.
Before installing Forge, it is crucial to ensure that you have a compatible version of Minecraft. Forge is typically available for the Java Edition of Minecraft, so make sure you have that version installed on your computer. Additionally, create a backup of your Minecraft world or profile to safeguard your progress. Modding can sometimes introduce compatibility issues or unexpected crashes, so having a backup ensures that you can easily revert to a stable state if needed.
To install Forge, you need to acquire the correct version from the official Forge website. Visit the Forge website (files.minecraftforge.net), and navigate to the Downloads section. Here, you will find a list of available Forge versions. Make sure to select the version that corresponds to your Minecraft version. Forge maintains compatibility with several Minecraft versions, so choose the appropriate one for your needs. Once you have selected the version, click on the Installer link to initiate the download.
After the Forge installer has finished downloading, locate the file and run it. The installer will prompt you to select an installation location. By default, it will detect your Minecraft installation directory, so you can proceed with the default selection. Next, click on the Install button to begin the installation process. Forge will automatically install the necessary files and create a new Forge profile in the Minecraft Launcher.
With Forge successfully installed, you are now ready to explore the extensive world of Minecraft mods and enhance your gaming experience. Enjoy the limitless possibilities and embark on new adventures!
What is Minecraft Forge?

Minecraft Forge is a modding platform and application programming interface (API) that allows players to install, manage, and run mods in Minecraft. It serves as a bridge between the Minecraft game and the modifications created by the Minecraft modding community.
Forge provides developers with a set of tools, libraries, and resources to create mods that can extend and enhance the gameplay experience. It simplifies the process of modding by providing a standardized framework and compatibility layer for mods to interact with the Minecraft game code.
For players, Forge offers an easy way to install and manage mods. It ensures that mods are compatible with each other and with the specific version of Minecraft being played. By using Forge, players can add new features, gameplay mechanics, items, blocks, creatures, and much more to their Minecraft worlds.
One of the key advantages of using Minecraft Forge is its extensive modding community. Forge has become the most popular modding platform for Minecraft due to its robustness, compatibility, and active development. The Forge community provides a vast library of mods that cater to various interests and playstyles, offering players a virtually unlimited range of possibilities to customize and personalize their Minecraft experience.
Overall, Minecraft Forge is a powerful tool that empowers both developers and players to unlock the full potential of modding in Minecraft. It enables the creation, installation, and management of mods, fostering creativity, innovation, and endless possibilities within the Minecraft universe.
Installing Forge on Windows
- Ensure you have Java installed: Minecraft Forge relies on Java to function properly. Make sure you have the latest version of Java installed on your computer. If you don’t have Java, you can download it from the official Java website (java.com) and follow the installation instructions.
- Download the Forge installer: Visit the official Minecraft Forge website (files.minecraftforge.net) using a web browser. On the website, you’ll find a list of available Minecraft versions. Choose the version that matches the version of Minecraft you have installed. Click on the recommended or latest version of Forge for that Minecraft version. It will redirect you to an ad page, so be sure to skip any ads or pop-ups and click on the “Skip” or “Skip Ad” button to proceed to the download page. Once you reach the download page, click on the Windows icon to download the Forge installer.
- Run the Forge installer: Locate the downloaded Forge installer file (it usually has a .jar extension) and double-click on it to run it. If prompted, select “Open with Java” or “Java Platform SE Binary” to execute the installer.
- Choose the installation location: The Forge installer will open a window with installation options. You can choose the installation location by clicking on the “…” button next to the “Install client” option. Select a directory where you have Minecraft installed or create a new directory specifically for Forge.
- Install client version: Ensure that the “Install client” option is selected, as this is the option you need to install Forge for single-player gameplay. If you plan to set up a server, you can choose the “Install server” option as well. Then, click on the “OK” or “Install” button to start the installation process.
- Wait for the installation to complete: The Forge installer will download the necessary files and set up Forge on your computer. This process may take a few moments, depending on your internet connection and computer speed.
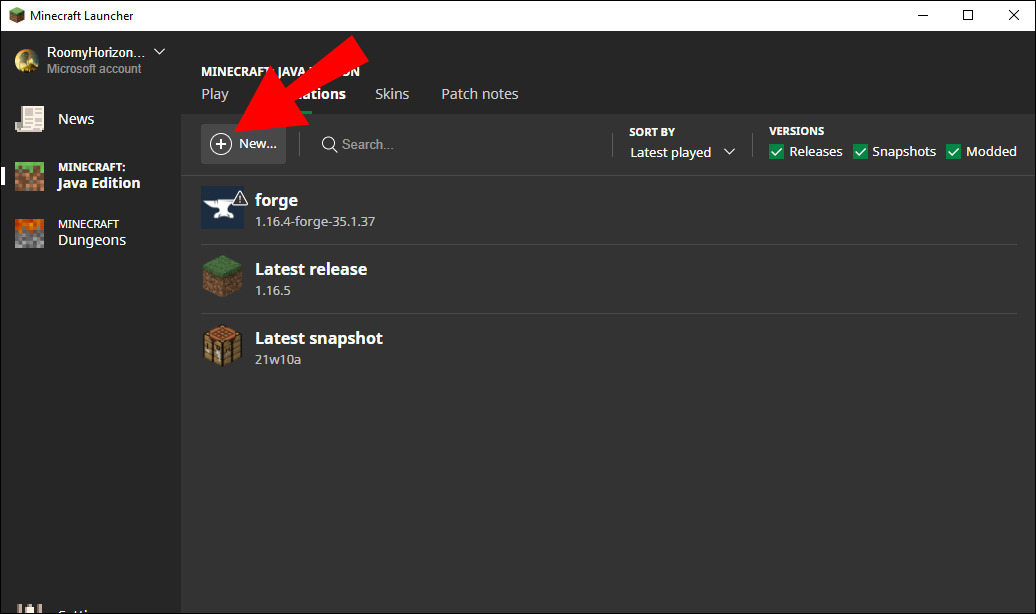
- Launch Minecraft with Forge: Once the installation is complete, open the Minecraft launcher. You should see a new Forge profile available. Select the Forge profile and click on the “Play” button to launch Minecraft with Forge enabled.
Congratulations! You have successfully installed Minecraft Forge on your Windows computer. You can now explore and install mods by downloading them from trusted sources and placing the mod files into the “mods” folder within the Minecraft directory. Remember to always use reputable sources for mods to ensure their compatibility and safety.
Installing on Mac
- Ensure you have Java installed: Minecraft Forge requires Java to run. Check if you have Java installed on your Mac by opening the Terminal application (found in the Utilities folder within the Applications folder) and typing
java -version. If Java is not installed, you will be prompted to install it. - Download the Forge installer: Visit the official Minecraft Forge website (files.minecraftforge.net) using a web browser. Look for the version of Forge that matches your Minecraft version and click on the recommended or latest version. On the download page, click on the “Installer” button to start the download.
- Run the Forge installer: Once the Forge installer is downloaded, locate the installer file (it usually has a .jar extension) in your Downloads folder or the location you saved it in. Double-click on the installer file to run it. If prompted, select “Open” to confirm running the installer.
- Choose the installation location: The Forge installer will open a window with installation options. Click on the “Install Client” button to install Forge for single-player gameplay. If you plan to set up a server, you can choose the “Install Server” option as well. Select the Minecraft directory where you have Minecraft installed or create a new directory specifically for Forge. Then, click on the “OK” button.
- Wait for the installation to complete: The Forge installer will download the necessary files and set up Forge on your Mac. This process may take a few moments, depending on your internet connection and computer speed.
- Launch Minecraft with Forge: Once the installation is complete, open the Minecraft launcher. You should see a new Forge profile available. Select the Forge profile and click on the “Play” button to launch Minecraft with Forge enabled.
Congratulations! You have successfully installed Minecraft Forge on your Mac. You can now explore and install mods by downloading them from trusted sources and placing the mod files into the “mods” folder within the Minecraft directory. Remember to always use reputable sources for mods to ensure their compatibility and safety.
Installing on Linux
- Ensure you have Java installed: Minecraft Forge requires Java to run. Open a terminal on your Linux system and check if Java is installed by typing
java -version. If Java is not installed, you can install it by running the appropriate command for your Linux distribution. For example, on Ubuntu, you can usesudo apt install default-jreto install Java. - Download the Forge installer: Visit the official Minecraft Forge website (files.minecraftforge.net) using a web browser. Look for the version of Forge that matches your Minecraft version and click on the recommended or latest version. On the download page, click on the “Installer” button to start the download.
- Open a terminal: Once the Forge installer is downloaded, open a terminal on your Linux system.
- Navigate to the download directory: Use the
cdcommand to navigate to the directory where the Forge installer is located. For example, if it is in your Downloads directory, you can use the commandcd Downloadsto move into that directory. - Make the installer executable: In the terminal, run the command
chmod +x <installer-file>to make the Forge installer file executable. Replace<installer-file>with the actual name of the Forge installer file you downloaded. - Run the Forge installer: Execute the Forge installer by running the command
./<installer-file>. Replace<installer-file>with the actual name of the Forge installer file. - Choose the installation location: The Forge installer will open a window with installation options. Click on the “Install Client” button to install Forge for single-player gameplay. If you plan to set up a server, you can choose the “Install Server” option as well. Select the Minecraft directory where you have Minecraft installed or create a new directory specifically for Forge. Then, click on the “OK” button.
- Wait for the installation to complete: The Forge installer will download the necessary files and set up Forge on your Linux system. This process may take a few moments, depending on your internet connection and system speed.
- Launch Minecraft with Forge: Once the installation is complete, open the Minecraft launcher. You should see a new Forge profile available. Select the Forge profile and click on the “Play” button to launch Minecraft with Forge enabled.
Congratulations! You have successfully installed Minecraft Forge on your Linux system. You can now explore and install mods by downloading them from trusted sources and placing the mod files into the “mods” folder within the Minecraft directory. Remember to always use reputable sources for mods to ensure their compatibility and safety.


