
Welcome to the enchanting realm of Minecraft Java Edition, where the possibilities are as boundless as your imagination. While the vanilla version of the game offers an awe-inspiring canvas for creativity, the true magic of Minecraft lies in the realm of mods. These marvelous modifications, crafted by talented individuals within the gaming community, bestow players with the power to transform their worlds into unique, personalized realms of wonder.
Embarking on the journey of installing mods can be both exhilarating and slightly intimidating for newcomers. Yet, fear not, for the process is well worth the effort and opens up a universe of exciting gameplay possibilities. In this guide, we shall delve into the art of installing mods on Minecraft Java Edition, illuminating the path to customization, exploration, and endless adventure.
Unlike other versions of Minecraft, Java Edition boasts a robust modding community due to its open nature. This versatility empowers players to breathe new life into their beloved game by introducing modifications that range from game mechanics, new biomes, and creatures to astonishing visual enhancements.
Before embarking on your modding expedition, it is vital to understand that mods come in various forms, each designed to cater to specific player desires. Some mods focus on improving performance and stability, while others immerse players in entirely new dimensions of magic and fantasy. Choose your mods wisely, and always ensure they are compatible with your current Minecraft version.
The process of installing mods generally involves integrating a modding platform such as Forge or Fabric into your Minecraft environment. These platforms act as the bedrock for mods to coexist harmoniously within your game. By providing a framework for compatibility, they pave the way for an exceptional modding experience.
Once equipped with the appropriate modding platform, the delightful task of selecting your desired mods begins. Peruse reputable mod repositories, and be inspired by the treasure troves of imaginative creations designed by fellow players. Whether you seek to summon mythical beasts, construct magnificent structures with ease, or expand your technological prowess, there is undoubtedly a mod tailored to your wishes.
Installing mods is akin to adorning your world with magical charms. Each mod added brings forth new adventures, surprises, and discoveries. It is a testament to the collaborative spirit of the Minecraft community, where players generously share their creativity, ingenuity, and passion for the game.
So, fellow adventurer, embrace the art of modding, and let your Minecraft Java Edition experience transcend the limits of the ordinary. Unleash your imagination and set forth on a wondrous odyssey through a realm shaped entirely by your dreams and aspirations. The modding path awaits, and its wonders are yours to uncover!
How to Install Mods on Minecraft Java Very Quickly & Very Easily
Installing mods on Minecraft Java Edition can indeed be a quick and straightforward process. Here’s a brief and easy-to-follow guide to get you started:
- Choose a Modding Platform: Decide whether you want to use Forge or Fabric as your modding platform. Forge is more established and has a vast selection of mods, while Fabric offers faster updates and is popular among newer mods.
- Download and Install the Modding Platform: Go to the official website of your chosen modding platform (Forge or Fabric) and download the installer for the version of Minecraft you have. Run the installer and follow the on-screen instructions to install the modding platform.
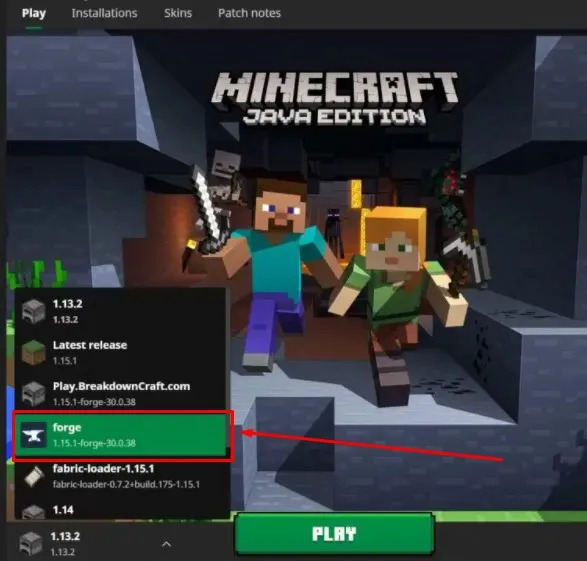
- Launch Minecraft: Open the Minecraft Launcher and click on the drop-down menu to select the modding platform you installed (Forge or Fabric). Click “Play” to start the game with the modding platform activated.
- Download Mods: Visit a reputable mod website like CurseForge or Planet Minecraft to browse and download the mods you want. Make sure to choose mods that are compatible with your Minecraft version and the modding platform you installed.
- Locate the “Mods” Folder: Once Minecraft is running, go to the game’s main menu and click on “Options” > “Resource Packs” > “Open Resource Pack Folder.” In this folder, you’ll find a subfolder called “mods.”
- Install Mods: Simply drag and drop the downloaded mod files (usually in .jar or .zip format) into the “mods” folder. If you want to manage mods more efficiently, you can use a mod manager like MultiMC.
- Activate Mods and Play: Close and relaunch Minecraft. From the main menu, click on “Mods” to see a list of all installed mods. Ensure that the mods you want to use are checked, then click “Done.” Your game is now modded, and you can jump into your world or start a new adventure with the added features and content.
- Keep Mods Updated: Regularly check for updates for both Minecraft and the mods you’ve installed. Sometimes, mods may need to be updated to work with the latest version of Minecraft or to fix bugs.
Remember, while installing mods can be easy, always download mods from reputable sources to avoid any potential security risks. With the right mods, Minecraft’s already incredible universe can expand exponentially, offering you new challenges, thrilling experiences, and boundless creativity. Enjoy your modded Minecraft journey!
Using Mods in Mincraft : Java Edition
Minecraft Java Edition’s thriving modding community has revolutionized the game, elevating it from a sandbox adventure to an expansive realm of limitless possibilities. By using mods, players can customize their gameplay, add new content, and explore unique dimensions not found in the vanilla version. Embracing mods can breathe new life into your Minecraft experience, offering endless hours of excitement and creativity.
To get started with mods on Minecraft Java Edition, follow these steps:
- Select a Modding Platform: Before diving into the world of mods, choose a modding platform that suits your preferences. The two most popular platforms are Forge and Fabric. Forge has a vast collection of mods and has been around for a long time, while Fabric is known for its quick updates and lightweight design.
- Install the Modding Platform: Visit the official websites of your chosen modding platform (Forge or Fabric) and download the installer compatible with your Minecraft version. Run the installer and follow the prompts to install the modding platform.
- Launch Minecraft with Mods: Open the Minecraft Launcher and click on the drop-down menu to select the modding platform you installed (Forge or Fabric). Click “Play” to start the game with the modding platform activated.
- Download Mods: Head to reputable mod repositories such as CurseForge or Planet Minecraft to browse the extensive selection of mods. Ensure you download mods compatible with your current Minecraft version and modding platform.
- Locate the “Mods” Folder: Once Minecraft is running, access the “mods” folder by navigating to the game’s main menu, then click on “Options” > “Resource Packs” > “Open Resource Pack Folder.” Within this folder, you’ll find another folder named “mods.”
- Install Mods: Drag and drop the downloaded mod files (usually in .jar or .zip format) into the “mods” folder. Alternatively, you can use a mod manager like MultiMC to organize and manage your mods efficiently.
- Activate Mods and Play: Close and relaunch Minecraft. From the main menu, click on “Mods” to view a list of all installed mods. Make sure to enable the mods you wish to use by checking their boxes, then click “Done.” Your game is now modded, and you can dive into your world or begin a new adventure with the exciting additions and enhancements.
- Update Mods Regularly: Stay up-to-date with Minecraft and your installed mods. Mod developers often release updates to fix bugs, introduce new features, or maintain compatibility with the latest Minecraft version.
As you venture into the realm of modding, keep in mind that not all mods are compatible with each other. Be selective, and avoid installing too many mods at once to prevent potential conflicts and performance issues. Lastly, have fun exploring the vast array of mods available and immerse yourself in the boundless creativity of the Minecraft modding community!
Downloading Mods
Downloading mods for Minecraft Java Edition is a straightforward process that allows you to enhance your gaming experience with new features, content, and gameplay mechanics. Follow these steps to safely download mods:
- Choose a Trusted Mod Repository: Start by selecting a reputable mod repository where you can find and download mods.
- Find the Desired Mod: Browse the mod repository for the specific mod you want to download. You can use the search function or browse categories to find mods that suit your preferences. Read the descriptions, user reviews, and ratings to ensure the mod meets your expectations and is compatible with your Minecraft version.
- Check Compatibility: Verify that the mod is compatible with your current Minecraft version. Mods developed for older or newer versions might not work correctly or could cause issues in your game.
- Download the Mod File: Once you’ve found a mod that interests you, click on the download button provided by the mod repository. The file is usually in .jar or .zip format.
- Locate the “Mods” Folder: Open your Minecraft installation folder on your computer. The location of this folder depends on your operating system:
- For Windows: Go to “C:\Users[YourUsername]\AppData\Roaming.minecraft\mods”.
- For macOS: Go to “~/Library/Application Support/minecraft/mods”.
- For Linux: Go to “~/.minecraft/mods”.
- Install the Mod: Drag and drop the downloaded mod file into the “mods” folder. Make sure that Minecraft is not running during this process.
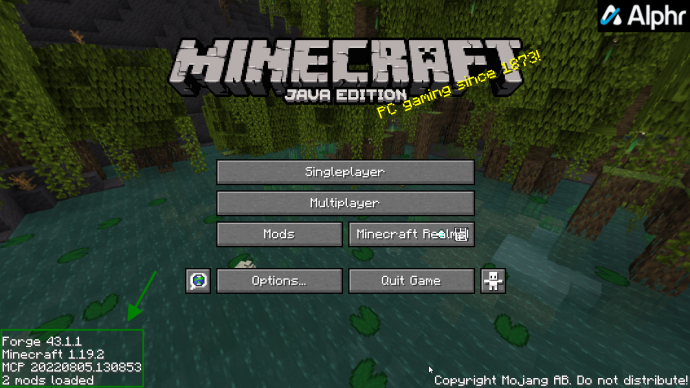
- Launch Minecraft: After installing the mod, start Minecraft. If the mod is compatible and correctly installed, you will see a message in the game’s loading screen indicating that the mod has been loaded.
- Verify Mod Functionality: Once in the game, access the main menu and click on “Mods” to see a list of installed mods. Ensure the mod you downloaded is listed and enabled. If not, double-check that you placed the mod file in the correct folder.
- Enjoy Your Modded Gameplay: With the mod installed and activated, you can now enjoy the new content and features it brings to your Minecraft world.
Remember, it’s essential to download mods from reputable sources to avoid potential malware or compatibility issues. Additionally, always back up your worlds before installing new mods to safeguard your progress and avoid data loss. Happy modding!
Conclusion!
In conclusion, delving into the realm of installing mods on Minecraft Java Edition is an exciting journey that unlocks a realm of limitless creativity and gameplay possibilities. Whether you seek to add new dimensions, magical creatures, futuristic technology, or simply enhance your building capabilities, mods offer a universe of customized experiences that cater to your unique tastes.
By following a few simple steps, you can seamlessly introduce mods into your Minecraft world. First, select a modding platform like Forge or Fabric, which acts as the foundation for a harmonious integration of mods. Once installed, browse reputable mod repositories such as CurseForge or Planet Minecraft to find mods that match your interests and are compatible with your Minecraft version.


