
Minecraft, the beloved sandbox game, has captured the hearts of millions of players worldwide. With its boundless creativity and immersive gameplay, Minecraft offers a unique experience that can be tailored to suit individual preferences. While the vanilla game is incredibly enjoyable, installing mods can take your Minecraft adventures to a whole new level.
Mods, short for modifications, are user-created content that add new features, mechanics, and content to the game. From new dimensions to powerful weapons, mods offer a virtually unlimited array of possibilities for players to explore. However, the process of installing mods may seem intimidating to newcomers.
In this comprehensive guide, we will demystify the process and provide step-by-step instructions on how to install mods on Minecraft. We’ll cover everything you need to know, from choosing the right modding platform to troubleshooting common installation issues.
But why should you consider installing mods? The answer lies in the incredible variety and enhanced gameplay they bring. Mods can introduce exciting new challenges, expand the game’s content, and provide fresh experiences even for seasoned players. Whether you’re seeking adventurous quests, magical encounters, or creative building options, mods can transform Minecraft into a customized wonderland tailored to your preferences.
Why Install Mods on Minecraft?
Minecraft, with its blocky landscapes and endless possibilities, has captivated players of all ages. The game’s innate charm lies in its ability to spark creativity and encourage exploration. However, as enticing as the vanilla experience is, installing mods can elevate Minecraft to new heights, opening up a world of boundless creativity and adventure.
One of the primary reasons to install mods is the ability to expand gameplay options. Mods introduce new features, mechanics, and content that can enhance and diversify the Minecraft experience. Whether it’s adding new biomes, creatures, or gameplay elements, mods allow players to tailor their adventures to their liking.
Furthermore, mods can breathe fresh life into Minecraft for seasoned players. After countless hours of building and exploring, mods inject a much-needed breath of fresh air, introducing exciting challenges and scenarios. They can introduce new quests, magical abilities, technological advancements, and intricate systems that extend the game’s longevity and provide a renewed sense of wonder.
For those with a creative streak, mods offer a plethora of building options. From expansive new blocks and materials to advanced construction tools, mods provide a vast canvas for architectural masterpieces. Building enthusiasts can push the boundaries of their imagination, constructing awe-inspiring structures that go beyond the limitations of the base game.
Preparing for Mod Installation
Before diving into the exciting world of Minecraft mods, it’s essential to prepare yourself for a smooth and hassle-free installation process. Taking a few precautionary steps will help ensure that your Minecraft experience remains uninterrupted and that your mods function optimally. In this section, we’ll guide you through the necessary preparations to make your mod installation journey a success.
Backup Your Minecraft Files:
Before installing any mods, it’s crucial to back up your Minecraft files. This precautionary measure will protect your existing worlds, saves, and configurations in case any issues arise during the mod installation process. Create a backup of your entire Minecraft directory by copying it to a separate location on your computer or an external storage device.
Check Minecraft Version Compatibility:
Mods are typically designed for specific Minecraft versions. Before selecting and downloading mods, double-check that they are compatible with your current Minecraft version. Installing mods intended for different versions may cause conflicts, crashes, or other unexpected issues. Verify the compatibility information provided by mod creators and ensure it matches your Minecraft version.
Update Minecraft and Java:
Keeping your Minecraft and Java versions up to date is crucial for a smooth modding experience. Update your Minecraft launcher to the latest version available. Additionally, ensure that you have the latest version of Java installed on your computer, as Minecraft heavily relies on Java for its operation.
Familiarize Yourself with Modding Platforms:
Different modding platforms, such as Forge, Fabric, or Rift, require specific installation methods. Familiarize yourself with the platform you plan to use for modding Minecraft. Research the installation process, documentation, and community support for the chosen platform. Understanding the basics will help you navigate the installation process smoothly.
Allocate Sufficient System Resources:
Modded Minecraft can be more demanding on your computer’s resources than the vanilla game. Ensure that your system meets the minimum requirements for both Minecraft and the mods you plan to install. Allocating more RAM to Minecraft can also improve performance when running mods. Consult the documentation or forums of your chosen modding platform for guidance on adjusting RAM allocation.
Choosing the Right Modding Platform
When it comes to installing mods in Minecraft, choosing the right modding platform is essential. Modding platforms serve as frameworks that allow mods to be installed and run seamlessly within the Minecraft game. Each platform has its own features, compatibility, and mod library, making it crucial to select the one that aligns with your needs and preferences. In this section, we’ll explore some popular modding platforms and help you make an informed decision.
Forge:
Forge is one of the most widely used and established modding platforms for Minecraft. It boasts a vast mod library and a robust set of tools for both mod creators and players. Forge provides an extensive API (Application Programming Interface) that allows mods to interact with each other and the game itself. Many popular mods are designed specifically for Forge, making it a safe bet for accessing a wide range of mods and modpacks.
Fabric:
Fabric is another popular modding platform known for its lightweight and efficient performance. It offers a more streamlined approach compared to Forge, making it ideal for players seeking a leaner modding experience. Fabric supports a growing number of mods, and its compatibility with the latest Minecraft versions ensures access to the newest features and improvements.
Rift:
Rift is a modding platform that emerged as an alternative to Forge during a specific Minecraft version transition. While it may have limited mod availability compared to Forge and Fabric, it can be a viable option for accessing mods that are specifically designed for Rift compatibility.
Choosing the right modding platform ultimately depends on your specific needs and preferences. If you prioritize access to a vast mod library and compatibility with a wide range of mods, Forge is a reliable choice. For those seeking a lightweight and efficient modding experience, Fabric offers a streamlined alternative. Rift can be considered if you have a specific mod in mind that is designed exclusively for that platform.
Installing Forge Mod Loader
Forge Mod Loader (commonly known as Forge) is a popular modding platform that enables you to install and manage mods in Minecraft. By following these step-by-step instructions, you’ll learn how to install Forge Mod Loader and prepare your Minecraft game for mod installation.
Downloading Forge:
Start by visiting the official Forge website (https://files.minecraftforge.net/) and navigate to the Downloads section. Choose the appropriate Minecraft version and click on the recommended or latest version of Forge Mod Loader. This will initiate the download process.
Running the Forge Installer:
Locate the downloaded Forge installer file and double-click on it to run it. A setup wizard will appear, guiding you through the installation process. Ensure that you have selected the correct Minecraft directory where you want to install Forge.
Selecting Installation Type:
In the Forge installer, you’ll be prompted to select an installation type. Choose the “Install client” option to install Forge for single-player Minecraft or the “Install server” option if you plan to set up a modded Minecraft server. Click “OK” to proceed.
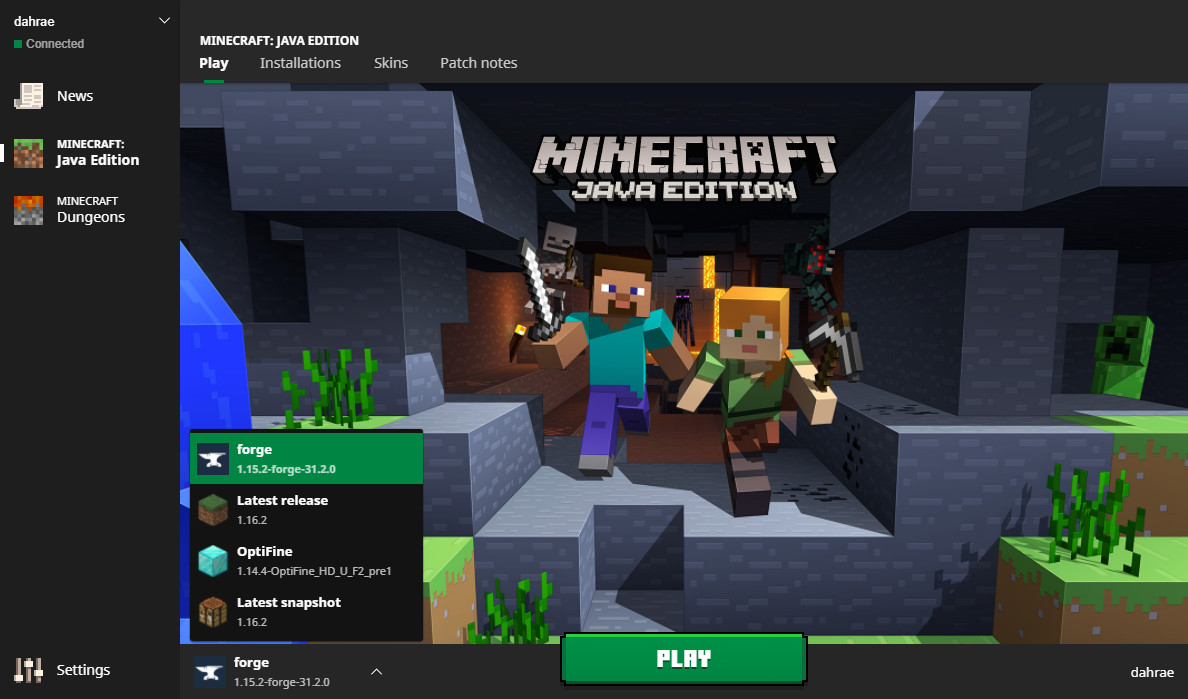
Modifying Minecraft Profile:
After the installation is complete, open your Minecraft launcher. In the lower-left corner, click on the “Installations” tab. You should see a new Forge installation listed. Click on it, and then click on the “Play” button to launch Minecraft with Forge.
Verifying Forge Installation:
Once Minecraft launches with Forge, you’ll notice a Forge splash screen. This indicates that Forge Mod Loader has been successfully installed. You can also verify the Forge installation by checking if a new “mods” folder has been created within your Minecraft directory.
Downloading and Installing Mods
With Forge Mod Loader installed, you’re now ready to embark on an exciting journey of downloading and installing mods for Minecraft. Mods introduce new content, features, and mechanics that can enhance your gameplay experience. In this section, we’ll guide you through the process of finding reliable mods and installing them correctly.
Research and Find Reliable Mods:
Start by researching and finding mods that align with your interests. Visit reputable modding platforms such as CurseForge (https://www.curseforge.com/minecraft/mc-mods) and the official Minecraft Forum (https://www.minecraftforum.net/forums/mapping-and-modding-java-edition/minecraft-mods). Browse through the available mods, read user reviews, and check the compatibility information to ensure they work with your Minecraft version.
Download Mods:
Once you’ve identified the mods you want to install, click on their respective download links. Ensure that you’re downloading the correct version of the mod compatible with your Minecraft version and the Forge Mod Loader you installed. Save the mod files to a location on your computer where you can easily locate them.
Locate the Minecraft Mods Folder:
Open your Minecraft installation directory, which contains the Forge installation. Look for a folder named “mods.” If you don’t see one, you can create it manually. This folder is where you’ll place the downloaded mod files.
Install Mods:
Drag and drop the downloaded mod files into the “mods” folder. Alternatively, you can copy and paste the mod files into the folder. Ensure that you place the mods directly in the “mods” folder and not in any subfolders. Once the mod files are in the correct location, they are ready to be loaded by Forge when you launch Minecraft.
Launch Minecraft with Mods:
Open your Minecraft launcher and select the Forge profile you created earlier. Click on the “Play” button to launch Minecraft with the installed mods. During the loading process, Forge will recognize and load the mods you placed in the “mods” folder.
Launching Minecraft with Mods
Now that you have installed mods for Minecraft using Forge Mod Loader, it’s time to launch the game and start experiencing the exciting new content and features. In this section, we’ll guide you through launching Minecraft with your installed mods, ensuring that they load correctly and are ready for you to enjoy.
Launch Minecraft Launcher:
Open your Minecraft launcher by double-clicking on its icon. If you have a custom launcher, locate and open it accordingly.
Select Forge Profile:
In the Minecraft launcher, navigate to the “Installations” or “Launch Options” tab, depending on the version of the launcher you are using. Look for the Forge profile you created during the Forge Mod Loader installation process. Click on the profile to select it.
Configure Memory Allocation (Optional):
If you are using a large number of mods or experiencing performance issues, you may want to allocate more memory to Minecraft. To do this, find the “Settings” or “More Options” button for the Forge profile and click on it. Look for a field called “JVM Arguments” or “VM Arguments” and modify the value associated with “-Xmx” to allocate more memory. For example, you can change it to “-Xmx4G” to allocate 4GB of RAM. Remember to consider the available memory on your system when adjusting this value.
Launch Minecraft:
Once you have selected the Forge profile and made any necessary memory allocation adjustments, click on the “Play” button to launch Minecraft.
Verify Mods are Loaded:
During the loading process, Forge Mod Loader will recognize the installed mods and load them into the game. Pay attention to the loading screen, as it may display information about the mods being loaded. Once Minecraft has successfully launched, you can verify that the mods are loaded and ready to use.
Test the Mods:
To confirm that the mods are working correctly, create a new world or load an existing one. Explore the game and look for any mod-specific content, features, or changes. Interact with the new items, blocks, creatures, or gameplay mechanics introduced by the mods. If everything is functioning as expected, congratulations! You are now playing Minecraft with mods.
Remember to check the documentation or mod-specific instructions for any additional steps or configurations required by certain mods. Some mods may have specific settings or dependencies that need to be addressed for optimal performance.
Conclusion
Installing mods on Minecraft opens up a world of endless possibilities, allowing you to customize and enhance your gameplay experience. By following the steps outlined in this guide, you can successfully install mods using Forge Mod Loader and launch Minecraft with your desired modifications.
We started by preparing for mod installation, emphasizing the importance of backing up your Minecraft files, checking compatibility, and updating Minecraft and Java. Next, we explored the process of choosing the right modding platform, highlighting Forge, Fabric, and Rift as popular options.
Moving forward, we covered the installation of Forge Mod Loader, including downloading the installer and running it to set up Forge in your Minecraft directory. With Forge installed, we then delved into finding reliable mods, downloading them, and placing them in the appropriate “mods” folder.


