
In the vast and pixelated universe of Minecraft, players embark on epic adventures, build magnificent structures, and create their own virtual realms. The game’s immersive sandbox environment allows for boundless creativity, enabling players to shape their worlds according to their whims and fancies. One essential element of design and ambiance is lighting, which not only adds visual appeal but also serves practical purposes. Among the various lighting options available, candles have become a popular choice, bringing warmth and a cozy glow to Minecraft’s blocky landscapes. This guide will walk you through the art of lighting candles, exploring the various techniques and possibilities that await your creative endeavors.
Candles in Minecraft have quickly become a favored decorative feature, providing a soft, atmospheric light that enhances the overall aesthetic of any build. Whether you’re constructing a grand castle, a cozy cottage, or an underground hideout, candlelight adds a touch of enchantment and allure. Unlike traditional light sources such as torches or glowstone, candles offer a more intimate and personal illumination, exuding a warm and inviting atmosphere. To unlock the potential of these delightful luminaries, it is important to understand how to craft and place them strategically within your Minecraft world.
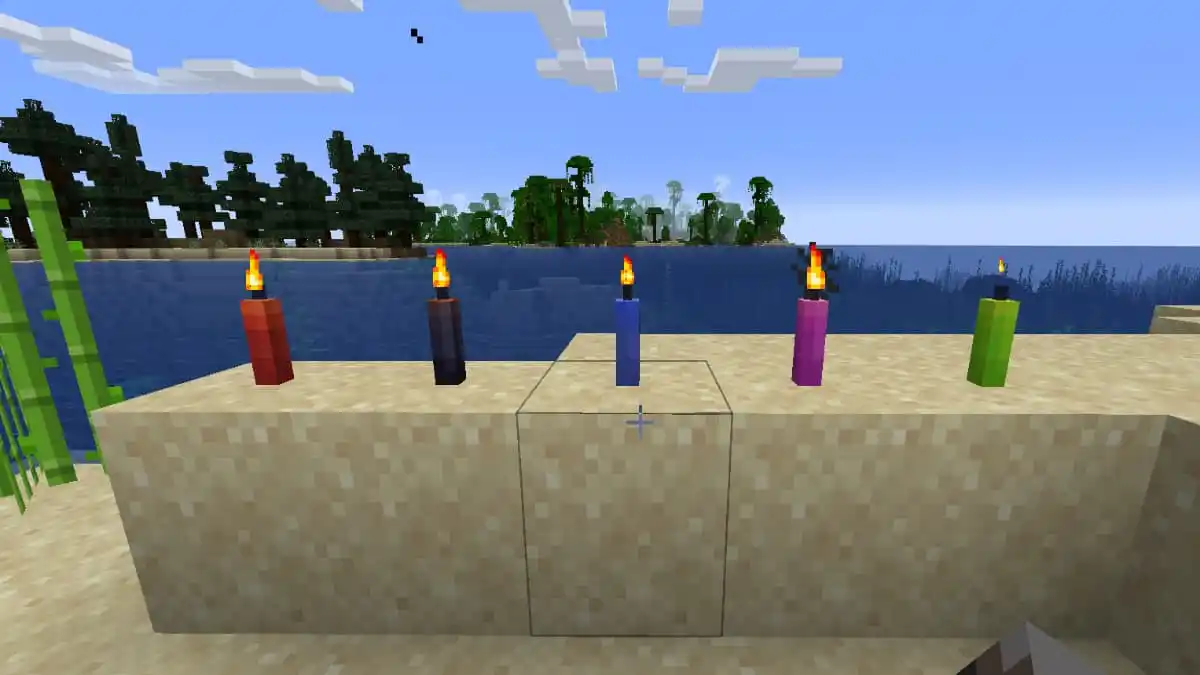
To ignite the charm of candles, you must first gather the necessary resources. The ingredients for crafting candles include string, honeycomb, and a dye of your choice. String can be obtained by slaying spiders or looting dungeons, while honeycomb is acquired from beehives or bee nests. Once you have gathered these components, the crafting process begins. By combining these ingredients in a specific arrangement within your crafting table, you can create beautiful candles in a variety of colors to suit your desired aesthetic.
Now that you have crafted your candles, it’s time to illuminate your Minecraft world with their enchanting glow. Placing candles strategically can significantly enhance the atmosphere and visual appeal of any location. Whether you wish to illuminate an indoor space, line a pathway, or create a cozy outdoor setting, candles can transform your surroundings. With careful consideration of placement, you can achieve the perfect balance between functionality and beauty, adding a touch of magic to your Minecraft experience.
As you embark on your Minecraft journey, don’t overlook the transformative power of candles. Their warm glow and delicate flicker can elevate your builds, evoking a sense of wonder and enchantment in your virtual realm. Embrace the art of candlelight and let your creativity shine!
Making Candles
To make candles in Minecraft, you will need the following materials and steps:
Materials:
- String: You can obtain string by killing spiders or by finding it in dungeons as loot.
- Honeycomb: Honeycomb can be collected from beehives or bee nests. Use shears to collect it without angering the bees.
- Dye: Choose a dye of your choice to color the candles. Dye can be crafted using various materials such as flowers, ink sacs, or other items.
Steps:
- Open your crafting table: Right-click on a crafting table or use the crafting interface in your inventory screen to access the crafting grid.
- Arrange the materials: Place the materials in the correct pattern in the crafting grid to create candles. The crafting recipe is as follows:
- Place 3 string in a horizontal row across the middle row of the crafting grid.
- Put 1 honeycomb in the center slot of the top row.
- Add 1 dye of your choice in the center slot of the bottom row.
The arrangement should be as follows:
SSS

H D
S = String, H = Honeycomb, D = Dye
- Retrieve the candles: Once you have placed the materials in the correct pattern, a set of four candles will appear in the result slot of the crafting grid.
- Collect the candles: Drag the candles from the result slot into your inventory. You can repeat the crafting process to make more candles as desired.
Now that you have crafted candles, you can place them in your Minecraft world. Candles can be placed on solid blocks, such as the ground or on top of other blocks. When you place a candle, it will automatically light up and emit a soft, warm glow. Experiment with different colors and arrangements to create beautiful lighting effects and enhance the ambiance of your builds.
Do candles spread fire?
No, candles in Minecraft do not spread fire. Unlike other light sources such as torches, candles do not have the ability to ignite flammable blocks or entities around them. This means that you can safely place candles in close proximity to other blocks or decorative elements without the risk of starting a fire. Candles provide a purely visual and atmospheric effect, offering a warm and cozy ambiance to your Minecraft creations without any danger of spreading flames. So, feel free to incorporate candles into your designs and enjoy their enchanting glow without worrying about fire hazards.
What do you need to light candles in Minecraft?
To light candles in Minecraft, you will need the following materials:
- Candles: Candles are the main item required to create and light them. They can be crafted using string, honeycomb, and a dye of your choice.
- String: String is an essential component for crafting candles. It can be obtained by killing spiders or looting dungeons.
- Honeycomb: Honeycomb is another necessary ingredient for crafting candles. You can obtain honeycomb by harvesting it from beehives or bee nests.
- Dye: You will also need a dye of your choice to add color to the candles. Dye can be crafted using various materials like flowers, ink sacs, or other items, depending on the color you desire.
Once you have gathered these materials, you can craft candles by combining them in a specific arrangement within your crafting table. The exact crafting recipe for candles may vary depending on the version of Minecraft you are playing, so it’s recommended to consult the in-game crafting interface or refer to reliable Minecraft resources for the specific recipe.
Once crafted, candles can be placed in the game world. However, candles do not require any additional steps to light them. Unlike other light sources that need to be ignited, candles are automatically lit as soon as you place them. They will emit a warm glow, adding a cozy and enchanting atmosphere to your Minecraft builds.
Flint And Steel
Flint and Steel is a tool in Minecraft that allows you to create fire and ignite various flammable objects and blocks. Here’s a guide on how to obtain and use Flint and Steel:
Obtaining Flint and Steel:
- Gather Flint: Flint is an item that can be obtained by breaking gravel blocks. When you break gravel, there is a chance it will drop Flint.
- Acquire Iron Ingot: To create Flint and Steel, you’ll need an Iron Ingot. Iron Ingots are obtained by smelting Iron Ore in a furnace.
Crafting Flint and Steel: Once you have Flint and an Iron Ingot, follow these steps to craft Flint and Steel:
- Open your crafting table: Right-click on a crafting table or use the crafting interface in your inventory.
- Arrange the materials: Place the Iron Ingot in the center space of the middle column, and place the Flint in the space directly above it.The arrangement should be as follows:
   I

F
I = Iron Ingot, F = Flint
- Retrieve Flint and Steel: Once you have placed the materials in the correct pattern, a Flint and Steel item will appear in the result slot of the crafting grid.
- Collect Flint and Steel: Drag the Flint and Steel item from the result slot into your inventory.
Using Flint and Steel: Now that you have Flint and Steel, you can use it to ignite various objects and blocks:
- Igniting objects: Right-click or use the “Use Item/Place Block” button while holding the Flint and Steel in your hand to create fire. You can use it to ignite TNT, activate Nether Portals, set blocks or entities on fire, and more.
- Caution: Be careful when using Flint and Steel as fire can spread and cause damage. Make sure to exercise caution and avoid igniting flammable structures or objects that you don’t want to be destroyed.
Remember, Flint and Steel can be a useful tool in Minecraft for creating fire and manipulating the game world, but it should be used responsibly and with caution to avoid any unintended consequences.
Fire Charge
Fire Charges are items in Minecraft that can be used to ignite blocks and entities. They are throwable projectiles that create fire upon impact. Here’s a guide on how to obtain and use Fire Charges:
Obtaining Fire Charges:
- Gather Blaze Powder: Blaze Powder is a crafting ingredient that can be obtained by defeating Blazes. Blazes are hostile mobs found in Nether Fortresses. When defeated, they may drop Blaze Rods.
- Craft Fire Charges: Once you have Blaze Powder, you can craft Fire Charges using the following recipe:
- Open your crafting table.
- Place Blaze Powder in the center slot of the crafting grid.
- Surround the Blaze Powder with Coal or Charcoal. Fill the remaining slots of the crafting grid with Coal or Charcoal.
The arrangement should be as follows:
   C C C

C B C

C C C
C = Coal or Charcoal, B = Blaze Powder
- Retrieve Fire Charges: Once you have placed the materials in the correct pattern, three Fire Charges will appear in the result slot of the crafting grid.
- Collect Fire Charges: Drag the Fire Charges from the result slot into your inventory.
Using Fire Charges: With Fire Charges in your inventory, you can use them in the following ways:
- Throwing Fire Charges: Select the Fire Charges in your hotbar. Right-click or use the “Use Item/Place Block” button to throw the Fire Charge. It will travel in an arc and explode upon impact.
- Igniting blocks and entities: When a Fire Charge explodes, it creates fire on the block it lands on. The fire can spread to nearby flammable blocks and ignite entities within its range.
- Fire Charge as a light source: Fire Charges can be placed on solid blocks to act as a temporary light source. Right-click or use the “Use Item/Place Block” button while pointing at a block to place a Fire Charge. It will create a small, temporary fire on the block.
Remember to use Fire Charges responsibly, as fire can spread and cause damage. Exercise caution and avoid igniting flammable structures or objects that you don’t want to be destroyed. Fire Charges can be a useful tool in Minecraft for creating fire-based traps, lighting up areas, or adding a fiery touch to your builds.
Flaming Projectile
In Minecraft, a flaming projectile refers to an arrow that has been set on fire. It is commonly known as a “Flaming Arrow” or “Fire Arrow.” When shot from a bow, the flaming projectile has the ability to ignite blocks and entities upon impact. Here’s a guide on how to create and use flaming projectiles in Minecraft:
Creating Flaming Projectiles: To create flaming projectiles, you will need the following materials:
- Arrows: Arrows can be crafted using a combination of Flint, Sticks, and Feathers. They can also be found as loot in various locations, such as dungeons or by defeating skeletons.
- Flint and Steel: To ignite the arrow and set it on fire, you will need a Flint and Steel, which can be crafted using Flint and an Iron Ingot.
Using Flaming Projectiles: Once you have the necessary materials, follow these steps to use flaming projectiles:
- Equip a Bow: Make sure you have a Bow in your hotbar or equipped in your hand.
- Ignite the Arrow: With the Flint and Steel in your hand, right-click or use the “Use Item/Place Block” button to ignite it. The Flint and Steel will create a small flame animation.
- Load the Bow: Right-click or hold the right mouse button to draw back the bowstring and charge the shot.
- Shoot the Flaming Projectile: While still holding the right mouse button, aim the crosshair at your target and release the button to shoot the arrow. The arrow will fly in the direction you aimed, leaving a trail of flame particles behind it.
- Igniting Blocks and Entities: When the flaming arrow hits a block or entity, it has the potential to ignite them. Flammable blocks will catch fire, and entities such as mobs or players may also catch fire upon impact.
It’s important to exercise caution when using flaming projectiles, as fire can spread and cause damage to structures or unintended targets. Be mindful of your surroundings and avoid shooting flaming arrows in areas where you don’t want fire to spread.
Flaming projectiles can be useful for combat, setting up traps, or adding a fiery effect to your gameplay. Enjoy the exciting possibilities of using flaming projectiles in Minecraft, but remember to use them responsibly!
Conclusion!
In conclusion, the world of Minecraft offers various ways to create and interact with fire and lighting elements. From lighting candles to using Flint and Steel or unleashing flaming projectiles, these tools add an extra layer of excitement, creativity, and functionality to your Minecraft experience.
Candles have become a popular choice for adding a warm and enchanting glow to your builds. By crafting candles using string, honeycomb, and dye, you can create a diverse range of colors and strategically place them to enhance the ambiance of your virtual world.


