
Elevators play a vital role in Minecraft, providing a convenient and efficient means of vertical transportation within the game. Whether you’re constructing a towering skyscraper or an intricate underground lair, mastering the art of building elevators will greatly enhance your Minecraft experience.
In this introductory guide, we will delve into the fascinating world of Minecraft elevators, exploring different types, designs, and redstone mechanisms that bring them to life. By the end of this tutorial, you’ll be equipped with the knowledge and skills to construct your very own functional and stylish elevators, seamlessly connecting various floors and levels in your structures.
To embark on this elevating journey, you’ll need to gather the necessary resources, including basic building materials, redstone components, and miscellaneous items. From there, we’ll guide you through the process of planning the elevator, choosing the design that best suits your needs, and selecting the ideal location for its installation.
1. Understanding Elevators in Minecraft
What is an elevator in Minecraft?
In Minecraft, an elevator is a mechanism that allows players to travel vertically between different floors or levels of a structure. It provides a convenient and efficient way to navigate through tall buildings, mineshafts, or any multi-level construction. Elevators eliminate the need for time-consuming staircases or ladders, offering a more streamlined experience.
Why should you build an elevator?
Building an elevator in Minecraft offers several advantages. Firstly, it saves time and effort by providing quick access to different levels of a structure. This is especially beneficial in large-scale projects or survival gameplay, where efficient movement is crucial.
Additionally, elevators can add a touch of realism and sophistication to your builds, making them more visually appealing and functional. Lastly, elevators can enhance gameplay convenience, allowing players to transport items, mobs, or even themselves effortlessly.
2. Gathering the Required Resources
To begin constructing an elevator in Minecraft, you’ll need to gather a variety of resources. These include basic building materials, redstone components, and miscellaneous items. Here’s a breakdown of the resources you’ll need:
Basic Building Materials:
- Blocks: Depending on your preferred design, you’ll need blocks to create the elevator shaft, floors, and supporting structures. Common choices include stone, wood, or various types of bricks.
- Slabs or Stairs: These can be used for creating the floors or steps within the elevator.
- Glass Panes or Blocks: Optional but can be used for elevator enclosures or windows, adding a decorative touch to your design.
Redstone Components:
- Redstone Dust: This is the core component for creating redstone circuits and mechanisms.
- Redstone Torches: Used to power and control the flow of redstone signals.
- Redstone Repeaters: These devices can delay or extend the redstone signal, allowing for more complex circuitry.
- Pistons: Essential for piston-based elevators, as they provide the mechanical movement required for transportation.
- Observer Blocks: Optional but useful for detecting changes in the environment and triggering redstone signals.
Miscellaneous Resources:
- Minecart and Rails: Required for minecart elevators.
- Water Buckets: Necessary for water elevators, as they create the water columns that facilitate vertical movement.
- Ladders: Optional, but if you want to combine a ladder system with your elevator for manual access, you’ll need ladders.
Ensure you have sufficient quantities of these resources before starting your elevator project. The amount needed will depend on the size of your elevator, the number of floors, and the specific design you choose.
3. Planning Your Elevator
Before diving into the construction of your Minecraft elevator, it’s essential to plan and consider various aspects to ensure a successful and functional design. Here are the key steps to follow during the planning phase:
Choosing the Elevator Design:
Explore different elevator designs and mechanisms to determine the one that suits your needs. Popular options include piston-based elevators, water elevators, and minecart elevators. Consider factors such as space availability, desired speed, aesthetics, and compatibility with your building’s architecture.
Determining the Elevator’s Functionality:
Decide how you want your elevator to operate. Will it transport players only or also accommodate mobs, items, or minecarts? Additionally, consider if you want the elevator to be manually operated or automated using redstone mechanisms. Defining the functionality will help you select the appropriate design and components.
Selecting the Elevator Location:
Identify the ideal location within your structure to install the elevator. Consider factors such as accessibility, proximity to key areas, and available space. Depending on the elevator design, you might need to allocate vertical space for the shaft and additional space for redstone circuitry.
Estimating the Elevator Dimensions:
Determine the required dimensions for your elevator based on the design and its intended purpose. Consider the number of floors it needs to connect, the clearance space needed for players or minecarts, and any additional features you wish to incorporate, such as enclosures or decorative elements.
Considering Redstone Circuitry:
If you opt for a redstone-powered elevator, plan the circuitry required to control its movement. Consider the placement of redstone components such as repeaters, torches, and observer blocks, ensuring they fit within the elevator’s structure and align with the desired functionality.
Accounting for Safety Measures:
Keep safety in mind during the planning phase. If the elevator will transport players, ensure there are no hazardous elements, such as suffocation risks or falling hazards. Consider incorporating safety features like barrier blocks or pressure plates to prevent accidental falls.
Documenting Your Plan:
Create a blueprint or make notes detailing your elevator plan. Include measurements, redstone circuit diagrams, and any other relevant information to guide you during the construction process. This documentation will serve as a valuable reference as you build your elevator.
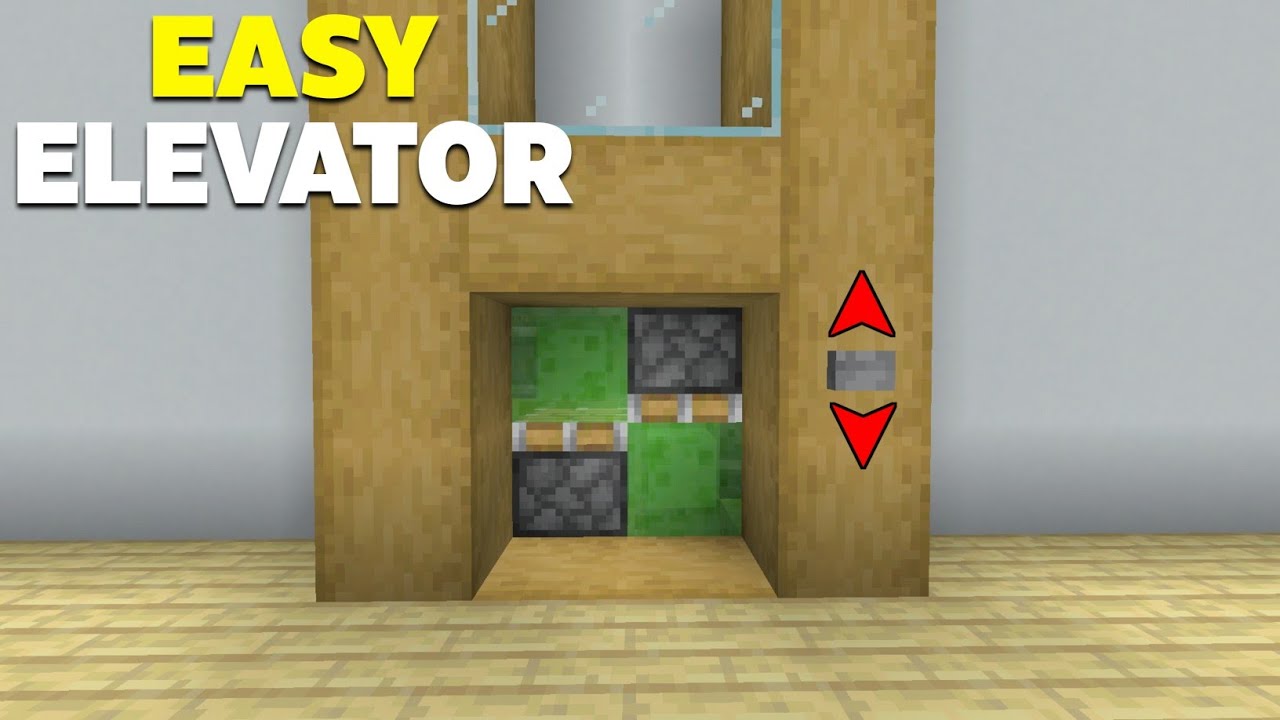
4. Building a Piston-based Elevator
Piston-based elevators are a popular choice in Minecraft due to their simplicity and versatility. They rely on the mechanical movement provided by pistons to transport players and other entities vertically. Follow these step-by-step instructions to build your own piston-based elevator:
Creating the Shaft and Floors:
- a. Determine the height and dimensions of your elevator shaft. Clear out a vertical space in your structure, ensuring it is wide enough to accommodate the desired elevator size.
- b. Begin by constructing the bottom floor of your elevator using the desired building blocks. This will serve as the starting point.
- c. Place a piston facing upward at the center of the bottom floor. Activate it using a redstone signal to extend the piston and create the first elevator platform.
Installing the Redstone Circuitry:
- a. Construct a vertical redstone wiring system adjacent to the elevator shaft. Ensure the wiring reaches the top of the shaft, allowing for connection to the upper floors.
- b. Place a redstone torch or a lever at the bottom of the shaft to power the elevator mechanism. This will provide the initial power source for the elevator.
- c. Connect the redstone wiring to the power source, ensuring the signal travels upwards along the shaft. Use repeaters as needed to maintain signal strength over long distances.
- d. At each floor, create a redstone circuit that connects to the main wiring. Use repeaters and redstone dust to extend the signal from the main wiring to each individual floor.
- e. For each floor, place a pressure plate or a button on the elevator platform. Connect it to the floor’s redstone circuit. This will act as a user-activated mechanism to call the elevator.
Testing and Troubleshooting:
- a. Test the elevator by standing on the bottom floor and activating the pressure plate or button. The piston should extend, lifting you to the next floor.
- b. Repeat the testing process on each floor, ensuring that the redstone circuits and elevator platforms function correctly.
- c. If any issues arise, check the wiring for connectivity problems, make sure the pistons are powered correctly, and ensure the redstone signals reach each floor without interruption. Adjust and troubleshoot as necessary.
Extending the Elevator:
- a. If you want to add more floors to your elevator, simply repeat the process for each additional floor.
- b. Ensure that the redstone circuitry is connected from the topmost floor to the bottom, allowing the elevator to travel the entire height of the shaft.
- c. Customize each floor’s design as desired, adding doors, decorations, or additional mechanisms.
5. Constructing a Water Elevator
Water elevators provide a unique and visually appealing way to transport players and entities vertically in Minecraft. They utilize water columns and bubble columns to achieve upward movement. Follow these step-by-step instructions to construct your own water elevator:
Building the Shaft and Water Columns:
- a. Determine the dimensions of your elevator shaft. Clear out a vertical space in your structure, ensuring it is wide enough to accommodate the elevator size.
- b. Start by creating a central column in the shaft using any solid block. This column will house the water source blocks for the elevator.
- c. Place water source blocks at the bottom and top of the central column. The water will flow and fill the column, creating a water column effect.
- d. Add additional columns of water along the sides of the central column at regular intervals, leaving a gap of one block between each column.
Understanding the Bubble Column Mechanics:
- a. To create upward movement in the water elevator, you need to utilize bubble columns. Bubble columns are created by placing magma blocks or soul sand beneath the water source blocks.
- b. Magma blocks create bubble columns that push entities upward, while soul sand creates bubble columns that pull entities downward.
- c. Determine whether you want your elevator to move players up or down. Place either magma blocks or soul sand at the bottom of your water columns accordingly.
Customizing the Water Elevator:
- a. Customize the appearance of your water elevator by surrounding the shaft with desired building blocks. This can include glass panes, fences, or decorative elements that enhance the visual appeal.
- b. Consider adding water source blocks or waterfalls at the entrance and exit points of the elevator to create a smooth transition into and out of the elevator.
Testing and Troubleshooting:
- a. Test the water elevator by entering the water column and observing the vertical movement. Ensure that the bubble columns are functioning correctly, pushing or pulling you as intended.
- b. If the elevator does not provide the desired movement, check the placement of the magma blocks or soul sand. Adjust them accordingly to achieve the desired effect.
- c. Test the elevator with various entities, such as mobs or items, to ensure they are also transported correctly.
Enhancing the Water Elevator:
- a. Add additional features to enhance the functionality and aesthetics of your water elevator. For example, you can incorporate ladders or signs along the sides of the water columns to allow for manual movement within the elevator.
- b. Consider adding lighting elements, such as sea lanterns or glowstone, to illuminate the elevator shaft and make it visually appealing.
In Conclusion
So, go forth and embark on your elevator-building journey. Elevate your Minecraft experience to new heights by seamlessly connecting floors and enjoying the convenience and beauty of your custom-made elevators. Happy building!
You have now learned the fundamentals of constructing elevators in Minecraft. Whether you choose to build a piston-based elevator or a water elevator, you can now provide efficient and stylish vertical transportation within your Minecraft world.
Elevators not only save time and effort but also add a touch of realism and functionality to your structures. They eliminate the need for tedious staircases or ladders, allowing you to navigate multiple floors with ease. Additionally, elevators can enhance the overall aesthetics of your builds, making them more visually appealing and impressive.


