
Welcome to our comprehensive guide on how to make a fence in Minecraft! As a passionate Minecraft player, you understand the importance of creating a secure and visually appealing environment for your adventures. Fences play a crucial role in achieving both of these objectives. They not only provide a boundary for your structures but also add a touch of elegance and functionality to your Minecraft world.
In this article, we will walk you through the step-by-step process of constructing fences in Minecraft. Whether you’re a beginner just starting your journey or an experienced player looking to refine your building skills, this guide has got you covered.
Fences in Minecraft serve various purposes, such as protecting your livestock from wandering off, enclosing your crops, securing your base from hostile mobs, or even adding decorative elements to your creations. The possibilities are endless, and understanding how to make a fence will empower you to bring your creative ideas to life.
Before delving into the construction process, it’s essential to grasp the basics. Fences in Minecraft can be crafted using different materials, each with its unique characteristics. The most commonly used materials for fences are wood and iron, but there are other options available as well. Choosing the right material for your fence depends on its intended purpose and the overall aesthetic you wish to achieve.
Understanding the Basics of Fences in Minecraft
Before diving into the construction process, it’s crucial to grasp the fundamentals of fences in Minecraft. Fences are versatile and essential components of your Minecraft world, serving both practical and decorative purposes. They act as barriers, preventing mobs and animals from crossing, while also adding structure and visual appeal to your creations.
In Minecraft, fences can be crafted using various materials, such as wood, iron, nether brick, and more. Each material has its unique properties and aesthetic qualities, allowing you to customize your fences to suit your preferences and specific needs.
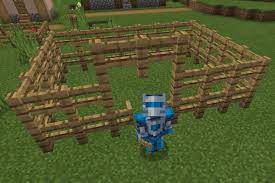
Wooden fences are the most commonly used type, as they are readily available and relatively easy to craft. They can be made from different types of wood, including oak, spruce, birch, jungle, acacia, and dark oak. Wooden fences blend seamlessly with the natural environment and can be stained with dyes for added variety. They are ideal for enclosing gardens, farms, or creating rustic boundaries for your structures.
On the other hand, iron fences provide greater security and durability. They require a more involved crafting process, as they are made from iron ingots obtained by smelting iron ore. Iron fences are particularly useful for fortifying your base, creating animal pens, or establishing boundaries in high-risk areas where hostile mobs are present.
Gathering Resources for Your Fence
Before you can start constructing your fence in Minecraft, it’s essential to gather the necessary resources. The type of fence you want to build will determine the specific materials you need to collect. Let’s explore the common resources required for wooden and iron fences.
For Wooden Fences:
-
Wood Logs: Depending on the type of wood you prefer (oak, spruce, birch, jungle, acacia, or dark oak), you’ll need to gather logs by chopping down the corresponding trees using an axe. Each log can be turned into four planks.
-
Sticks: Sticks are a crucial component in crafting fences. You can obtain sticks by placing two wooden planks vertically in the crafting table.
For Iron Fences:
-
Iron Ore: Iron ore can be found underground in caves and mines. Use a stone pickaxe or above to mine iron ore blocks. The mined blocks will yield iron ore.
-
Furnace: To smelt iron ore into iron ingots, you’ll need a furnace. Craft a furnace by arranging eight cobblestones in the crafting table, leaving the center block empty.
-
Fuel: To power the furnace, gather a fuel source such as wood, coal, or charcoal. These can be obtained by chopping down trees or mining coal blocks.
-
Smelting Iron Ore: Place the iron ore in the top slot of the furnace and the fuel source in the bottom slot. Once smelted, the furnace will yield iron ingots.
After gathering the necessary resources, you’re ready to proceed with crafting your fence. Head over to your crafting table and follow the specific recipe for the type of fence you wish to create. Keep in mind that different materials will have different recipes, so double-check the crafting menu if you’re unsure.
Crafting a Wooden Fence
Wooden fences are versatile and commonly used in Minecraft due to their accessibility and aesthetic appeal. They provide a rustic charm and are perfect for enclosing gardens, farms, or creating boundaries for your structures. Follow these step-by-step instructions to craft a wooden fence:
-
Gather Wood Logs: Start by obtaining the desired type of wood logs. You can find oak, spruce, birch, jungle, acacia, or dark oak trees in different biomes. Use an axe to chop down the trees and collect the wood logs.
-
Convert Logs to Planks: Place the wood logs in your inventory crafting grid or crafting table. Each log will yield four wooden planks. Alternatively, you can use the crafting table to convert the logs directly into planks by placing one log in any slot of the crafting table.
-
Crafting the Fence: Open your crafting table and arrange six wooden planks in two vertical columns, leaving the center and bottom rows empty. This will create three wooden fence pieces. One wooden fence piece occupies one slot in the crafting table.
-
Collect the Wooden Fences: Once the crafting is complete, click and drag the crafted wooden fences into your inventory.
-
Placing the Wooden Fences: Select the wooden fence from your inventory and right-click on the block where you want to place it. The wooden fence will connect to adjacent blocks, allowing you to create a continuous boundary or structure.
Repeat the process as needed to create additional wooden fences for your desired length or design. Feel free to experiment with different types of wood to achieve the aesthetic you desire.
Now you have successfully crafted and placed a wooden fence in Minecraft! It’s time to unleash your creativity and utilize wooden fences to protect your livestock, secure your base, or add visual interest to your Minecraft world.
Crafting an Iron Fence
Iron fences in Minecraft offer increased durability and security compared to wooden fences. While they require more resources and effort to craft, they are an excellent choice for fortifying your base, creating animal pens, or establishing boundaries in areas with hostile mobs. Follow these steps to craft an iron fence:
-
Gather Iron Ore: Iron ore can be found underground in caves and mines. Use a stone pickaxe or above to mine iron ore blocks. Each block will drop iron ore.
-
Smelt Iron Ore into Iron Ingots: Set up a furnace by arranging eight cobblestones in the crafting table, leaving the center block empty. Place the furnace in the world and open its interface. Add a fuel source (wood, coal, or charcoal) to the bottom slot of the furnace. Place the iron ore in the top slot of the furnace. The furnace will smelt the iron ore into iron ingots.
-
Crafting the Iron Fence: Open your crafting table. In a 3×3 grid, place six iron ingots, three in the top row and three in the bottom row. Leave the middle column empty. This will yield three iron fence pieces. Collect them from the crafting table.
- Collect the Iron Fences: Once crafted, click and drag the iron fence pieces into your inventory.
-
Placing the Iron Fences: Select the iron fence from your inventory and right-click on the block where you want to place it. Similar to wooden fences, iron fences will connect to adjacent blocks, allowing you to create a continuous barrier.
Remember, iron fences require iron ingots, which are obtained through smelting iron ore. Make sure to gather enough iron ore and fuel to create the desired number of iron ingots for your iron fence construction.
Congratulations! You have successfully crafted and placed an iron fence in Minecraft. Utilize these sturdy barriers to protect your valuables, secure your livestock, or create formidable boundaries in your Minecraft world.
Crafting an Iron Fence
Iron fences in Minecraft provide enhanced security and durability compared to their wooden counterparts. While they require additional resources and effort to craft, they are an excellent choice for fortifying your base, creating animal pens, or establishing boundaries in areas with hostile mobs. Follow these steps to craft an iron fence:
-
Gather Iron Ore: Iron ore can be found underground in caves and mines. Use a stone pickaxe or above to mine iron ore blocks. Each block will drop iron ore.
-
Smelt Iron Ore into Iron Ingots: Set up a furnace by arranging eight cobblestones in the crafting table, leaving the center block empty. Place the furnace in the world and open its interface. Add a fuel source (wood, coal, or charcoal) to the bottom slot of the furnace. Place the iron ore in the top slot of the furnace. The furnace will smelt the iron ore into iron ingots.
- Crafting the Iron Fence: Open your crafting table. In a 3×3 grid, place six iron ingots, three in the top row and three in the bottom row. Leave the middle column empty. This will yield six iron bars. Collect them from the crafting table.
-
Creating the Iron Fence: To craft an iron fence, place six iron bars in a 3×2 grid in the crafting table. Put three iron bars in the first row and three iron bars in the second row. This will create two iron fence pieces. Collect them from the crafting table.
- Collect the Iron Fences: Once crafted, click and drag the iron fence pieces into your inventory.
-
Placing the Iron Fences: Select the iron fence from your inventory and right-click on the block where you want to place it. Similar to wooden fences, iron fences will connect to adjacent blocks, allowing you to create a continuous barrier.
Congratulations! You have successfully crafted and placed an iron fence in Minecraft. Utilize these sturdy barriers to protect your valuables, secure your livestock, or create formidable boundaries in your Minecraft world. Remember to gather enough iron ore and fuel to create the desired number of iron ingots for your iron fence construction.
Advanced Fence Designs and Tips
Now that you have mastered the basics of fence construction in Minecraft, it’s time to explore advanced designs and tips to take your fences to the next level. These techniques will not only enhance the functionality of your fences but also add aesthetic appeal to your Minecraft world. Here are some ideas to consider:
-
Combining Fence Types: Experiment with combining different fence types to create unique designs. For example, mix wooden and iron fences to create an elegant and secure enclosure. This can add visual interest and variety to your structures.
-
Incorporating Gates and Doors: To provide easy access through your fences, incorporate gates or doors. Craft them using appropriate materials and place them within your fence line. Gates and doors can be opened and closed, allowing you to pass through while keeping unwanted entities out.
-
Adding Decorative Elements: Customize your fences by adding decorative elements such as lanterns, flower pots, or banners. These details can enhance the overall aesthetics of your Minecraft world and make your fences stand out.
-
Optimizing Fence Placement: Place fences strategically to optimize their effectiveness. For example, surround valuable crops or livestock with fences to protect them from wandering mobs. Additionally, consider placing fences on top of walls or around elevated structures for added security.
-
Experimenting with Heights and Patterns: Create visually appealing fences by varying the height and pattern of your fence placement. Mix full-height fences with half-height fences or create patterns with different materials to add texture and dimension.
-
Utilizing Fence Gates as Animal Pens: Fence gates can be used to create functional animal pens. Enclose an area with fences and add a fence gate as an entrance. This allows you to easily move animals in and out while keeping them securely contained.
Remember to regularly maintain and repair your fences, especially if they are subjected to damage from mobs or other sources. With these advanced designs and tips, you can elevate the functionality and aesthetics of your fences, enhancing the overall experience in your Minecraft world. Let your creativity shine and create fences that are not only functional but also visually captivating.
Conclusion:
Congratulations! You have reached the end of our comprehensive guide on how to make a fence in Minecraft. We hope this article has provided you with the knowledge and inspiration to create functional and visually appealing fences in your Minecraft world.
Fences play a vital role in establishing boundaries, securing your base, protecting your livestock, and adding aesthetic charm to your structures. By understanding the basics of gathering resources and crafting fences, you have gained the skills to bring your fence-building ideas to life.
Whether you opt for wooden fences for their rustic appeal or iron fences for their durability, remember to gather the necessary resources, follow the crafting recipes, and place your fences strategically to optimize their effectiveness.
Additionally, we explored advanced fence designs and tips to further enhance your creations. By experimenting with different materials, incorporating decorative elements, and considering optimal placement, you can take your fences to the next level and create unique and functional designs.


