
Welcome to the whimsical world of Minecraft, where your imagination knows no bounds, and you have the power to create entire worlds from scratch. Among the countless things you can build in this digital realm, there’s one essential structure that often goes unnoticed but plays a significant role in a player’s everyday life – the toilet. While not a mandatory element in the game, crafting a functional and aesthetically pleasing toilet can add a touch of realism and comfort to your virtual abode.
In this comprehensive guide, we will walk you through the process of creating the perfect Minecraft toilet, complete with all the essential components to make your in-game experience as immersive as possible. Whether you’re a seasoned builder or a beginner setting foot in this pixelated universe for the first time, you’ll find this guide easy to follow and highly rewarding.
Before we embark on this creative journey, it’s crucial to understand that Minecraft is a sandbox game that encourages players to experiment and invent. There are no fixed rules for crafting a toilet, allowing your imagination to take the lead. However, we’ll provide you with a basic blueprint and various design ideas to spark your creativity.
To build a toilet, you’ll need to gather a few essential materials, which can be easily found within the game’s world. Wood, stone, and iron are some of the primary resources required. Alongside the materials, you’ll also need a crafting table, which will serve as your workstation throughout the process.
Building a toilet isn’t just about placing blocks together; it’s also about incorporating functional elements. We’ll discuss various toilet designs, including flushing mechanisms, sinks, and even quirky decorations that can add character to your lavatory. After all, who said a Minecraft toilet can’t be stylish and fun?
Whether you’re constructing a simple outhouse or a grand bathroom inside a mansion, the key is to experiment, enjoy the process, and let your creativity flow as freely as water down the drain. So, grab your pickaxe and crafting table, and let’s dive into the world of Minecraft toilet building – an adventure like no other!
Creating a Minecraft Toilet
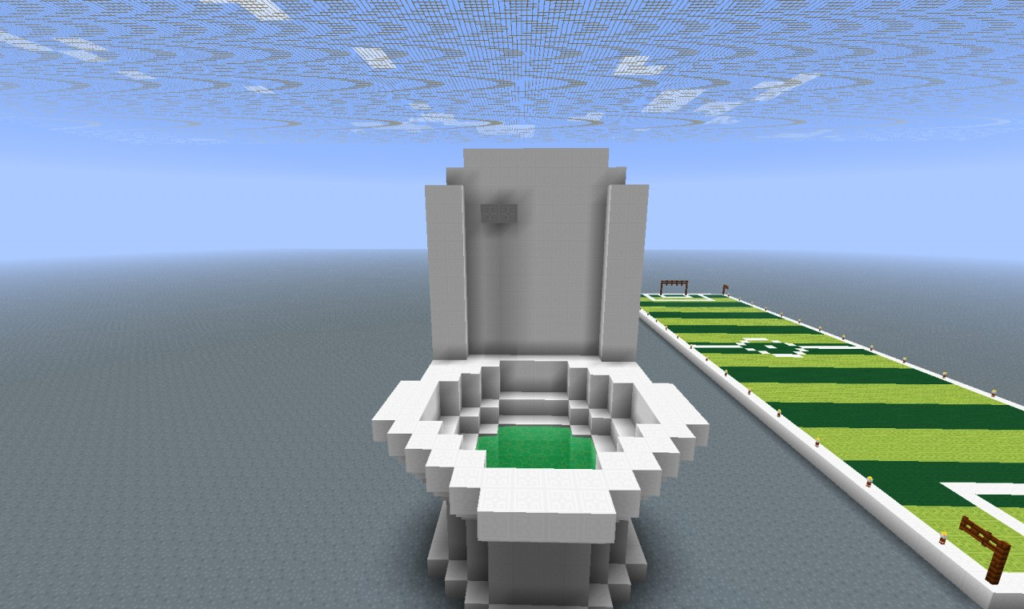
Building a functional Minecraft toilet can add a touch of realism and charm to your virtual abode. While there’s no fixed way to create one, this step-by-step guide will help you construct a simple yet efficient toilet for your in-game needs.
Step 1: Gather Materials For this basic toilet, you’ll need the following materials:
- 6 blocks of any material for the toilet base (e.g., stone, wood, or concrete)
- 1 trapdoor (wooden or iron) for the seat cover
- 1 water bucket for flushing
- 2 blocks of water
- 1 button to act as the flushing mechanism
Step 2: Choose a Location Select a suitable location in your Minecraft world for your toilet. Consider building it indoors to maintain privacy, or outside with a small enclosure for a more rustic feel.
Step 3: Lay the Foundation Place your chosen blocks in a 2×3 arrangement on the ground to form the base of the toilet. This will serve as the main structure.
Step 4: Create the Toilet Seat Position the trapdoor on the top center block of the base. This will act as the seat cover. When the trapdoor is closed, it will give the appearance of a closed lid.
Step 5: Implement the Flushing Mechanism Place a water bucket in one of the two blocks on the back row of the toilet base. This will act as the water tank. Then, put a button on the block above the water bucket. When pressed, the button will release the water and flush the toilet.
Step 6: Add the Water Outlet On the other block of the back row, place a block of water. This will serve as the water outlet for the toilet.
Step 7: Test the Flush Before finalizing your construction, test the flushing mechanism by pressing the button and ensuring that the water flushes out properly from the water outlet.
Step 8: Finishing Touches Now that your basic toilet is complete, you can add some aesthetic touches to enhance its appearance. You could build a small partition for privacy, add decorations such as flower pots or paintings, or even incorporate a sink and mirror nearby.
Remember, the beauty of Minecraft lies in its limitless creativity, so feel free to customize and improve upon this design as you see fit. From elaborate bathrooms in grand castles to simple outhouses in rural villages, the possibilities are endless!
With this guide, you have taken your first step toward mastering the art of Minecraft toilet building. Embrace your creativity, and let your virtual world reflect your ingenuity and imagination!
Creating a Shower for Minecraft Toilet
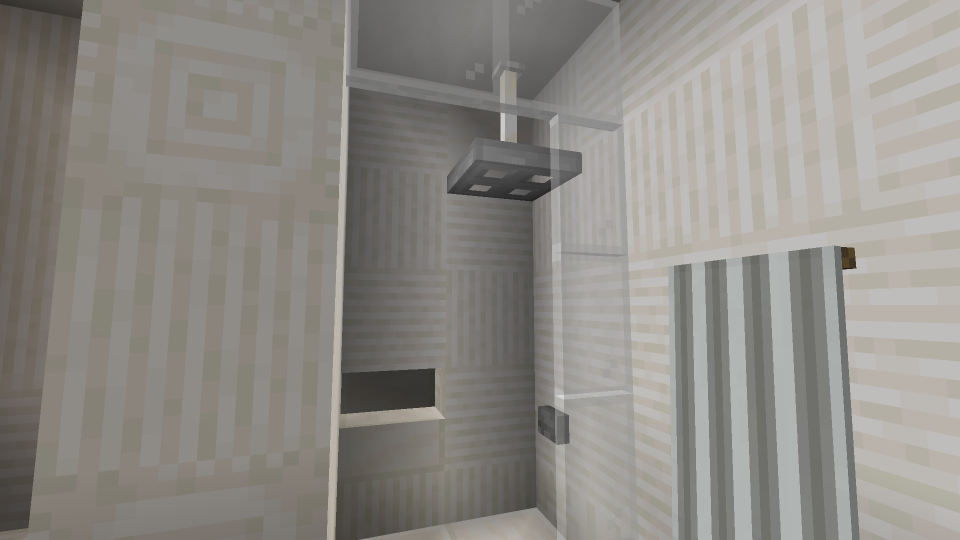
Adding a shower to your Minecraft toilet can elevate the level of realism and convenience in your virtual abode. Follow these simple steps to create a functional and aesthetically pleasing shower space:
Step 1: Choose the Location Select a suitable location within your Minecraft building to incorporate the shower. Ideally, it should be adjacent to the toilet area for easy access and convenience.
Step 2: Prepare the Shower Area Clear a space measuring at least 3×3 blocks for the shower. You can use any suitable building material for the walls, such as stone, bricks, or glass, to create the shower enclosure.
Step 3: Construct the Shower Floor For the shower floor, consider using different materials to differentiate it from the toilet area. Smooth stone or colored tiles work well to give the shower space a distinct appearance.
Step 4: Build the Showerhead Place a tripwire hook on the ceiling above the shower floor. This will act as the showerhead. You can use an iron trapdoor or any other suitable block as the showerhead design.
Step 5: Install the Water Source Position a water source block behind the tripwire hook. When the tripwire hook is activated, it will dispense water, simulating the flow of a shower.
Step 6: Create the Drain Add a drain for the shower to ensure that water doesn’t accumulate on the floor. Place a hopper below the shower floor to act as the drain. The hopper will collect the water and direct it away.
Step 7: Activate the Shower To activate the shower, place a lever or button near the entrance to the shower area. When you toggle the lever or press the button, the tripwire hook will activate, and water will flow from the showerhead.
Step 8: Optional: Decorate and Add Features Enhance the shower area by adding decorative elements such as shelves, benches, or hanging towels. You can also incorporate a shower curtain made of banners or colored blocks for added realism.
With these steps, you’ve successfully created a functional shower space within your Minecraft toilet. This simple addition can add an extra touch of comfort and utility to your in-game living spaces. As always, feel free to experiment and customize the design to suit your preferences and architectural style. Happy building!
Creating a Bath for Minecraft Toilet
Introducing a bath to your Minecraft toilet can provide a relaxing and luxurious element to your virtual living space. Follow these straightforward steps to create a delightful bath area:
Step 1: Choose the Location Select a suitable location adjacent to your Minecraft toilet to build the bath area. Ensure that you have enough space for the bath and any additional decorative elements you want to add.
Step 2: Prepare the Bath Area Clear a space measuring at least 3×3 blocks to create the bath area. You can use various materials for the walls and floor, such as stone, bricks, or glass, to customize the bath’s appearance.
Step 3: Construct the Bath Place any large container or structure that resembles a bathtub in the center of the bath area. You can use a variety of blocks for this, such as cauldrons, or create a custom design using stairs and slabs.
Step 4: Add Water to the Bath Fill the bathtub structure with water. To do this, either place water source blocks directly into the bathtub or use a water bucket to fill it. Ensure the water level is sufficient to cover the bottom of the tub.
Step 5: Create the Faucet Build a faucet over the bathtub to simulate the water source. You can use a dispenser with a water bucket inside or any block that resembles a faucet design.
Step 6: Install the Drain Create a drain at the bottom of the bathtub to prevent water from spilling out. Place a hopper below the bathtub to act as the drain. The hopper will collect the water, giving the illusion of water draining away.
Step 7: Optional: Decorate and Enhance To enhance the bath area, consider adding decorative elements such as candles, plants, or bath products (made using banners or colored blocks). You can also build shelves or towel racks nearby to complete the luxurious feel.
Step 8: Test and Enjoy Once you have completed the construction, test the bath by activating the faucet and ensuring that water flows into the bathtub. Adjust the water level and placement of elements to achieve the desired effect.
With these steps, you’ve created a relaxing bath space within your Minecraft toilet, perfect for unwinding after a long day of adventures. As always, feel free to let your creativity run wild and tailor the design to suit your preferences and in-game style. Happy building and happy bathing!
How Do You Make Toilet Paper in Minecraft?
Method 1: Using Banners
- Craft White Banners: To create a simple toilet paper look, you can craft white banners by placing six white wool and one stick in the crafting table, arranged in a pattern resembling a banner.
- Hang Banners: Once you have the white banners, you can hang them on walls or place them on the floor near your Minecraft toilet to simulate the presence of toilet paper.
Method 2: Using Paper
- Craft Paper: To make paper, you’ll need three sugar canes. Harvest sugar cane from the water’s edge and craft them into paper in the crafting table.
- Place Paper: Similar to the banner method, you can place paper on the floor or hang them on walls near your toilet to create the illusion of toilet paper.
It’s important to note that while these methods allow you to represent toilet paper in Minecraft, the game itself does not include any dedicated toilet paper item. As Minecraft is a sandbox game, players often find creative ways to add elements that are not officially included in the game. Always be sure to check if there are any mods or custom resource packs available if you’re looking for more specific in-game items or decorations.
Conclusion!
In conclusion, crafting a toilet in Minecraft can be a fun and rewarding experience that adds an element of realism and comfort to your virtual living space. While there is no official toilet item in the game, players can use their creativity and resourcefulness to design functional and aesthetically pleasing toilets.
By following the step-by-step guide, you can construct a basic toilet with essential components such as a seat cover, flushing mechanism, and water outlet. Additionally, you can take your creations to the next level by incorporating showers, baths, sinks, and various decorative elements to enhance the overall ambiance.


