
Minecraft, the beloved sandbox game that has captured the hearts of millions worldwide, offers players a vast realm of endless creativity and exploration. However, there’s nothing more frustrating for a Minecraft enthusiast than encountering laggy gameplay. The stuttering frame rates, delayed movements, and unresponsive controls can significantly hinder the immersive experience that Minecraft promises. But what exactly causes this lag, and how can it be addressed?
Several factors contribute to Minecraft’s laggy performance, and understanding them is key to resolving the issue. First and foremost is hardware capability. Minecraft, despite its pixelated aesthetic, can be surprisingly demanding on your computer’s resources. The game’s intricate world generation, physics calculations, and complex redstone contraptions require a capable processor, sufficient RAM, and a dedicated graphics card to run smoothly.
Another crucial factor is network latency. When playing on multiplayer servers or engaging in online gameplay, a poor internet connection can result in lag. High latency can lead to delayed interactions and cause the game to freeze intermittently, disrupting the overall experience.
Additionally, the number of mods and resource packs installed can impact performance. While these additions enhance gameplay by introducing new features and stunning visuals, they can also strain your system’s resources. Each mod or resource pack introduces additional calculations and textures, increasing the workload for your computer.
To combat Minecraft lag, there are several steps you can take. Upgrading your hardware, such as investing in a faster processor or adding more RAM, can significantly improve performance. Optimizing your game settings, reducing the render distance, and disabling resource-intensive graphical features can also help.
For multiplayer gaming, connecting to servers with low latency and stable connections is essential. Choosing servers closer to your geographical location can minimize network latency and provide a smoother experience.
In conclusion, Minecraft lag can stem from hardware limitations, network latency, and resource-heavy modifications. By understanding these factors and implementing appropriate solutions, players can enjoy a lag-free Minecraft experience filled with creativity and adventure.
How to Reduce Lag in Minecraft

Reducing lag in Minecraft can greatly enhance your gaming experience and ensure smoother gameplay. Here are some effective tips to help you minimize lag and optimize performance:
- Lower Render Distance: Adjusting the render distance setting in Minecraft can have a significant impact on performance. Lowering the render distance reduces the number of chunks the game needs to load and render, thus reducing the strain on your computer’s resources.
- Optimize Graphics Settings: In the game’s video settings, consider disabling or reducing resource-intensive graphical features like fancy graphics, smooth lighting, and particles. Lowering graphics settings can free up system resources and improve performance.
- Allocate Sufficient RAM: Minecraft relies heavily on memory usage, and allocating an adequate amount of RAM to the game can help prevent lag. In the Minecraft launcher, go to the Installations tab, select your game version, and modify the allocated RAM in the “More Options” section.
- Close Background Applications: Closing unnecessary background applications frees up system resources and can positively impact Minecraft’s performance. Shutting down resource-intensive programs, such as web browsers or streaming services, can make a noticeable difference.
- Use Optifine or Performance Mods: Optifine is a popular mod that enhances Minecraft’s performance and provides additional optimization options. Installing Optifine can improve frame rates and reduce lag. Similarly, there are other performance-enhancing mods available that can help optimize the game.
- Remove Resource Packs and Mods: If you have numerous resource packs or mods installed, consider removing or reducing their number. Each resource pack or mod adds additional calculations and textures, potentially straining your system’s resources.
- Update Java and Graphics Drivers: Ensure that you have the latest version of Java installed on your computer, as Minecraft relies on it. Additionally, updating your graphics card drivers to the latest version can improve compatibility and performance.
- Play on Local Servers: Connecting to servers that are geographically closer to your location can reduce network latency and minimize lag. Playing on local servers with stable connections can provide a smoother multiplayer experience.
- Optimize Your Computer: Perform regular maintenance tasks on your computer, such as disk cleanup, defragmentation, and updating your operating system. Keeping your system in good condition can improve overall performance.
By implementing these tips, you can significantly reduce lag in Minecraft and enjoy a smoother, more immersive gameplay experience. Experiment with different settings and configurations to find the optimal setup for your system.
Change Video Settings in Minecraft
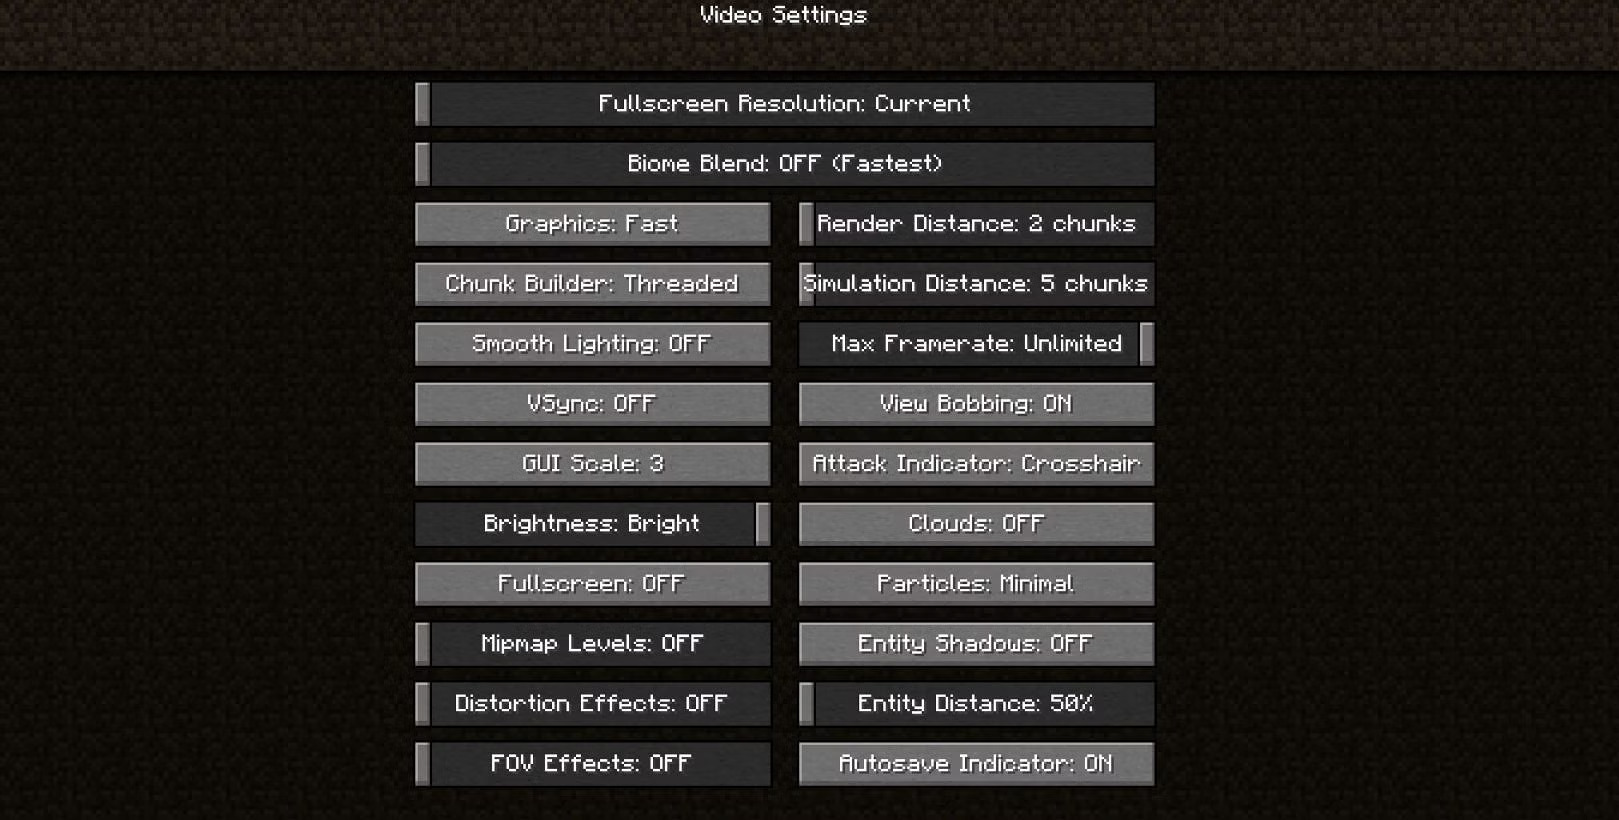
Changing video settings in Minecraft can help optimize the game’s performance and reduce lag. Here’s how you can adjust the video settings:
- Launch Minecraft: Open the Minecraft launcher on your computer.
- Access Video Settings: After launching the game, click on “Options” from the main menu, then select “Video Settings.”
- Adjust Graphics: In the Video Settings menu, you’ll find various graphics options to modify. Here are the key settings to consider:
- Render Distance: This setting determines how far you can see in the game world. Lowering the render distance reduces the number of chunks the game needs to load and render, which can improve performance. Experiment with different distances to find a balance between performance and visibility.
- Graphics: The “Graphics” setting offers options like Fast and Fancy. Choosing “Fast” disables certain graphical effects, while selecting “Fancy” enables more advanced visual features. Setting it to “Fast” can improve performance, but at the cost of some visual enhancements.
- Smooth Lighting: Smooth lighting adds realistic lighting effects to the game. However, it can be resource-intensive. Consider lowering the smooth lighting setting or turning it off completely to improve performance.
- Particles: Minecraft features various particle effects, such as smoke, rain, and explosions. Reducing the number of particles or disabling them altogether can help boost performance.
- Performance: In the “Performance” section, you may find additional options such as “Fast Math” or “Chunk Updates.” Enabling these options can optimize calculations and reduce lag.
- Adjust Fullscreen and Resolution: If you’re experiencing performance issues, try switching to windowed mode instead of playing in fullscreen. Additionally, lowering the game’s resolution can improve performance, but it will result in a less detailed display.
- Test Changes and Apply: After making adjustments to the video settings, click “Done” or “Apply” to save the changes.
Remember to experiment with different settings to find the optimal balance between performance and visual quality for your specific system. Each computer may respond differently to settings changes, so it’s a good idea to test and tweak as needed to achieve the best performance in Minecraft.
Allocate More RAM
To allocate more RAM to Minecraft, follow these steps:
- Launch the Minecraft Launcher: Open the Minecraft launcher on your computer.
- Select Installations: From the main screen of the launcher, click on the “Installations” tab.
- Edit the Game Version: Locate the version of Minecraft that you want to allocate more RAM to and click on the three dots (…) next to it. Then select “Edit.”
- Modify RAM Allocation: In the installation settings, you’ll see a section called “JVM Arguments” or “More Options.” Look for the line that starts with “-Xmx” or “-Xms” followed by a number. These arguments determine the maximum and initial amount of RAM allocated to Minecraft.
- Increase RAM Allocation: Modify the number after “-Xmx” to allocate more RAM to Minecraft. For example, if it currently reads “-Xmx2G,” change it to a higher value like “-Xmx4G” to allocate 4GB of RAM. Be cautious not to allocate too much RAM, as it may cause performance issues or conflicts with other applications running on your computer.
- Save the Changes: Once you’ve adjusted the RAM allocation, click “Save” or “Save Installation” to apply the modifications.
- Launch Minecraft: Return to the main screen of the Minecraft launcher and select the modified version from the drop-down menu in the bottom-left corner. Then click “Play” to launch the game with the updated RAM allocation.
Minecraft will now launch with the specified amount of RAM allocated to it, which can help improve performance and reduce lag. Remember that allocating excessive RAM may not always result in better performance, and it’s crucial to find a balance based on your computer’s capabilities and other running applications.
Perform a Disk Cleanup
Performing a disk cleanup can help optimize your computer’s storage and potentially improve performance. Here’s how you can do a disk cleanup on Windows:
- Open the File Explorer: You can open the File Explorer by pressing the Windows key + E or by clicking on the folder icon in the taskbar.
- Select the Drive to Clean: In the File Explorer, locate the drive that you want to clean up. Typically, this is the C: drive, which is the main system drive.
- Access the Properties: Right-click on the drive and select “Properties” from the context menu.
- Initiate Disk Cleanup: In the Properties window, click on the “Disk Cleanup” button. This will launch the Disk Cleanup utility.
- Select Files to Clean: The Disk Cleanup utility will analyze your drive and present a list of file types that can be cleaned up. Check the boxes next to the file types you want to delete. Some common options include temporary files, system files, and Recycle Bin contents.
- Additional Cleanup Options: To free up more space, you can click on the “Clean up system files” button. This will reanalyze your drive and present additional cleanup options related to system files and previous Windows installations. Check the desired options and click “OK” to proceed.
- Confirm Deletion: A confirmation dialog will appear, asking if you’re sure you want to delete the selected files. Review the selections and click “Delete Files” or “OK” to confirm.
- Wait for Cleanup: The disk cleanup process will begin, and the utility will delete the selected files. The duration of the cleanup depends on the amount of data being removed.
Once the disk cleanup is complete, you will have freed up storage space by removing unnecessary files. This can potentially improve your computer’s performance and create more room for other applications and data. It’s a good practice to perform disk cleanups regularly to keep your system optimized.
Update your Operating System and GPU Drivers
Updating your operating system and GPU drivers is essential for ensuring optimal performance, compatibility, and security. Here’s how you can update them:
Updating the Operating System:
Windows:
- Open the Start Menu: Click on the Windows Start button located at the bottom left of your screen.
- Access Settings: Click on the gear-shaped Settings icon in the Start Menu to open the Windows Settings.
- Go to “Update & Security”: In the Settings window, select the “Update & Security” option.
- Check for Updates: Click on the “Check for updates” button. Windows will automatically scan for available updates for your operating system.
- Install Updates: If updates are found, click on the “Install” or “Download and install” button to start the update process. Follow any on-screen instructions that may appear.
macOS:
- Open the Apple Menu: Click on the Apple logo in the top-left corner of your screen.
- Go to “System Preferences”: From the drop-down menu, select “System Preferences.”
- Access “Software Update”: In the System Preferences window, click on “Software Update.”
- Check for Updates: macOS will check for any available updates. If updates are found, click on the “Update Now” button.
- Install Updates: Follow the on-screen instructions to download and install the updates. Your Mac may need to restart during the update process.
Updating GPU Drivers:
- Determine your GPU: Identify the manufacturer and model of your graphics card. Common manufacturers include NVIDIA, AMD, and Intel.
- NVIDIA:
- drop-down menus.
- Download the latest driver version compatible with your operating system.
- Run the downloaded installer and follow the on-screen instructions to update the drivers.
- AMD:
- Download the latest driver package compatible with your operating system.
- Run the installer and follow the prompts to update the drivers.
- Intel:
- Click on the “Check Your System for the Latest Updates” button to scan your system for available driver updates.
- Follow the prompts to download and install the recommended drivers.
It’s important to regularly check for updates and install them to ensure that your operating system and GPU drivers are up to date. Keeping them updated can help improve performance, stability, and compatibility with various software applications, including games like Minecraft.
Conclusion!
In conclusion, Minecraft can be laggy due to various factors. The game’s demanding nature, including intricate world generation, physics calculations, and redstone contraptions, can strain hardware resources. Inadequate hardware, such as a slow processor, insufficient RAM, or lack of a dedicated graphics card, can contribute to lag.
Network latency and poor internet connection can also cause lag, especially during multiplayer gameplay. High latency leads to delayed interactions and intermittent freezing, disrupting the overall experience.


